Mac Dock | Ultimate Guide on Mac Dock
What Is Mac Dock
Mac Dock is a crucial part of the Mac operating system, allowing you to interact with it to launch applications and files, as well as switch between running applications. By default, it is situated at the bottom of the screen, matching the color of your wallpaper.
The Mac Dock is divided into two sections by a separator line. The left side holds app icons for launching and switching between applications, while the right side contains folders, minimized windows, and the Trash.

The apps on the Dock are separated by a line, with some apps having a black dot underneath, indicating they are currently running.
How to Use Mac Dock
Here are some fundamental interactions with Mac Dock:
- Open apps: Click the icon to open an app.
- Open minimized apps: On the right side of the Dock, minimized apps appear. Clicking the yellow button on an opened window minimizes it to the right side, where you can reopen it by clicking.
- Open a file within an app: You can drag a file over an app's icon to open the file in that app.
Mac Dock is a powerful tool that allows users to customize and personalize their Mac experience. In addition to launching applications and switching between them, Mac Dock also offers a range of advanced features. For example, users can create custom folders and add them to the Dock, allowing quick access to frequently used files and apps.
Mac Dock Shortcuts
You can use keyboard shortcuts on a Mac to interact with the Dock more efficiently, especially if you do a lot of typing.
General Keyboard Shortcuts Applicable to Mac Dock:
- To minimize the current window to the Dock, press Command + M on your Mac. This will shrink the window to a small icon on the Dock, freeing up space on your screen.
- To hide or show the Dock, press Option + Command + D.
- To add an app to the Dock from Finder and vice-versa, use the shortcut Control + Shift + Command + T. This allows you to easily move apps between the Dock and Finder, making it convenient to organize your workspace.
- To minimize all the windows of the front app, use the keyboard shortcut Option + Command + M. This will minimize all the windows of the currently active application, allowing you to focus on other tasks or switch to a different app.
- To access the Dock's quick settings menu, click and hold on any empty space beside the separating line on the Dock.
Specific Dock Shortcuts:
To focus on the Dock, you can press the keys Control + F3 or Control + Fn + F3 at the same time. Once the Dock is focused, you can apply specific shortcuts to perform various actions.
- The left and right arrow keys can be used to navigate through the items in the Dock.
- Up arrow key: to open the Dock menu.
- To open the selected app or file in the Dock, press the Return key. This will launch the application or open the file, allowing you to interact with it as needed.
- Hold the Option key and press the Left/Right arrow key to move the desired app to another place in the Dock.
- To open the item's location in Finder, press the Option key and click on a file or app.
- To force quit an app on a Mac, hold down the Command and Option keys and click on the app's icon in the Dock. This will open the app's menu with a "Force Quit" option, allowing you to quit the app immediately.
How to Add/Remove Items on Mac Dock
When you frequently use specific apps or files, you can add them to the Mac Dock to access them quickly. However, there is a difference between adding an app and a file: adding an app creates a shortcut to the app itself, while adding a file creates an alias to the file's location, rather than the file itself.
Add an App:
Step 1. To open a Finder window, click the Finder icon in the Dock, which is typically located at the bottom of the screen. This will launch a new Finder window, allowing you to navigate and interact with the files and folders on your Mac.
![]()
Step 2. Click "Applications" in the Finder sidebar.
Step 3. Choose the app you want and drag it to the Dock.
Step 4. Release the selected app when it hovers over the Mac Dock to place it. This will add the app to the Dock for quick access.
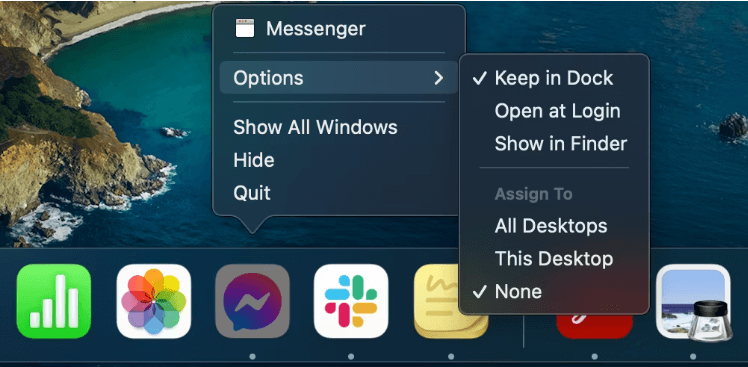
To add an app to the Dock, right-click the app icon and choose "Options" from the drop-down menu. Then, click "Keep in Dock" to make it permanently appear in the Dock until you remove it. This way, you do not need to manually drag the app icon to the Dock. The app will automatically show up in the Dock with a dot under it, and you can easily remove it by right-clicking and choosing "Remove from Dock".
Add a File:
Step 1. To add a file to the Dock, start by opening a Finder window, just like you would to add an app.
Step 2. To move a file or folder on a Mac, select it and drag it to the rightmost part of the Dock.
Step 3. Release the file or folder when it hovers over the right side of the Dock. You can also right-click the item in the Dock to access the "Show in Finder" feature, which quickly opens the file or folder's location.
Remove Items from the Dock:
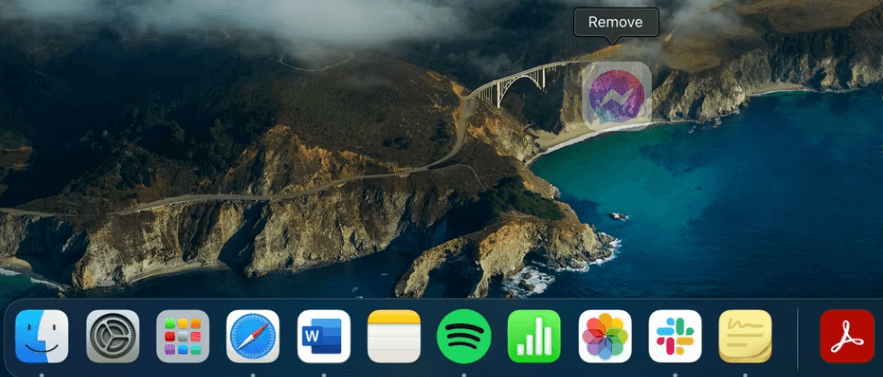
To remove an item from the Dock, simply drag it off until you see "Remove" and release it. Alternatively, hold Control and click on the item, then select "Options" and "Remove from Dock" from the shortcut menu.
How to Organize Dock Items
The Dock on a Mac allows you to add, remove, organize, and rearrange items. However, the Finder and Trash icons at the far left and right sides cannot be removed, as they serve as the main file system and deleted file storage, respectively. To free up space, you can empty the Trash.
Step 1. Choose an item in the Dock.
Step 2. To move an item to a new location, simply drag it to the desired spot and release it when it is hovering over the new placement.
How to Stack Folders in Dock
Creating a Stack on your Mac, which combines files, folders, and application aliases, can be more convenient and save space on your Desktop. To do this, you first need to create a Stack, which can then be dragged to the Mac Dock for easy access. This allows you to have a clutter-free Desktop while still maintaining quick access to your frequently used files and applications.
Step 1. To select the folder that will become the Stack, choose the existing or new folder in Finder by right-clicking and selecting it.
Step 2. To add a folder to the Dock, drag the folder icon from the Finder to the Dock, where a folder icon will appear with the name visible when you hover your pointer over it.

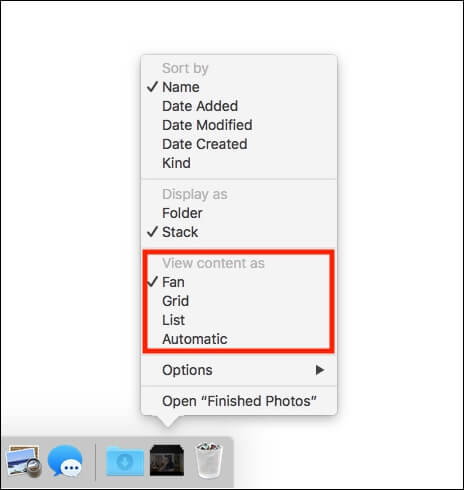
Step 3. Right-click on the icon and choose the primary views for the Stack to configure it.
How to Customize Mac Dock
If you want to give your Mac Dock a personalized touch, you can customize it to suit your style.
Positioning Dock
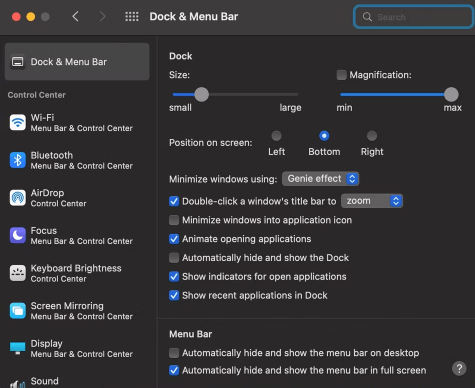
To change the position of the Dock on a Mac, open System Preferences, go to Dock & Menu Bar, and select the desired position from the options provided. This allows you to customize the Dock's location on the screen.

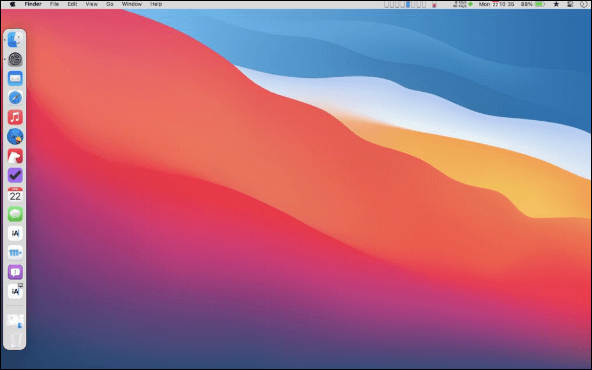
If you choose "Left" or "Right", your Dock will appear as a vertical line instead of its usual horizontal line.
Hiding Mac Dock
To hide the Dock on your Mac, go to System Preferences, then "Dock & Menu Bar", and check the box next to "Automatically hide and show the Dock". This will cause the Dock to only appear when your cursor is over the area where it normally resides, sliding out when you move your pointer to the edge and back in when you move away.
Changing Mac Dock Size
You can adjust the size of the Mac Dock in the Dock & Menu Bar preferences to make it larger if you do not have too many items on it, allowing for a clearer and more visually appealing view.
Magnifying Dock on Mac
To make the Dock larger and more noticeable when you hover over an icon, you can enable magnification in the System Preferences. This feature allows you to customize the effect of magnification to your liking.

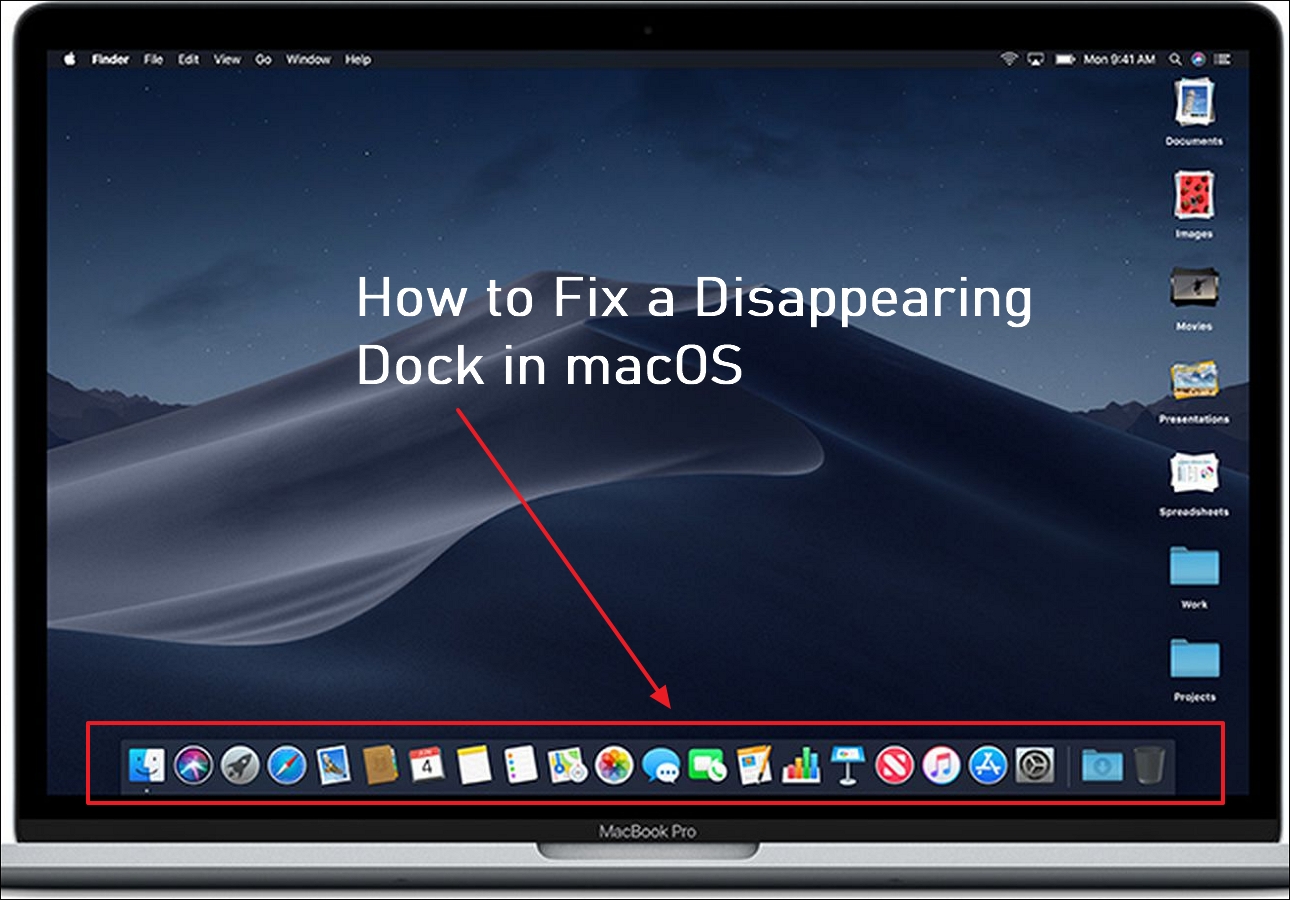
How to Fix A Disappearing Dock
If the Mac Dock disappears, try restarting your Mac, as this often resolves the issue. If the problem persists, check if the Dock is set to auto-hide in System Preferences, and toggle it to show on the left side of the screen. If the Dock still does not appear, try resetting the Dock by deleting the com.apple.dock.plist preference file and restarting your Mac.
To restart your Mac, you can either hold the power button or go to the Apple Menu and select "Restart".
The Mac Dock, which is a feature that provides quick access to frequently used applications and files, can sometimes disappear due to various reasons. This issue can occur when the Dock is accidentally hidden, or due to a software glitch.
How to Fix a Disappearing Dock in macOS Ventura/Monterey/Big Sur
The Mac Dock can sometimes disappear from the screen by default, and one of several things might be causing it to do so, including system errors or issues with the operating system.
Conclusion
After reading this guide, you will understand the core functions of Mac Dock, allowing you to interact with and customize your Dock on Mac more effectively.
Mac Dock FAQ
The following questions can help you learn more about Dock on Mac.
1. How do I customize my Mac Dock?
The article provides guidance on personalizing the Mac Dock, including adjusting its position and size, which can be done through the Dock & Menu Bar settings, where various other customization options are also available.
2. What is the Mac Dock called?
For Mac users, the Dock is a panel along the edge of the screen where frequently used apps and files are displayed.
3. What is the bottom Dock called in Mac?
At the bottom of Mac's screen is a quick access toolbar called the Dock, which can be customized by clicking on the Blue Apple and selecting Dock from the menu.
4. What is the alternative to macOS Dock?
Several alternatives to the macOS Dock include launcher applications such as Raycast, HyperDock, LaunchBar, DockShelf, QRMirror, Dropshelf, ActiveDock, and MultiDock.
Related Articles
- How Long Do SSDs Really Last? [New Study 2023]
- What Is VCRUNTIME140_1.DLL and How to Fix Issues with VCRUNTIME140_1.DLL
- What Is Force Quit Mac Shortcut? Ways to Force Quit Mac
- What Is MSTSC and How to Enable Remote Desktop with It?
- How to Keep Hard Drive Cool [Step-by-Step Guide]
Learn how to keep a hard drive cool and prevent overheating. Use airflow, placement, monitoring tools, and maintenance tips to protect data. - What Laptop Hard Drive Size Should I Use [2023 Explanation]
Learn common laptop hard drive sizes, form factors, and capacity options so you can choose the right HDD or SSD upgrade.