Detailed Guide: Get Toshiba Laptop to Boot From USB
If you're looking to boot your laptop from a USB drive, Qiling Software has a step-by-step guide to help you achieve this on your Toshiba laptop.
To get a Toshiba laptop to boot from USB, you'll need to enter the BIOS settings, which can usually be accessed by pressing a key such as F2, F12, or Del during startup. Once in the BIOS, look for the Boot Order or Boot Priority settings and select USB as the first boot device.
| ⏱️Duration | 5-7 Minutes (Step-by-step Tutorial) |
| 💻Applies to | To get your Toshiba laptop to boot from a USB drive on Windows 11/10/8/7, you'll need to create a bootable USB drive with a compatible operating system or recovery media. Here's a brief summary of the steps: |
| ⛏️ Tools |
✔️USB ✔️Windows ISO files ✔️Toshiba laptop or desktop |
| 🖌️ Stages | |
| 🔍Required Software | USB creators - Qiling Disk Master |
To boot a Toshiba laptop from a USB, you can follow these steps: Insert a USB drive with a valid operating system (such as Windows or Linux) into your laptop. Enter the BIOS settings by pressing the key (usually F2, F12, or Del) when the laptop is first turned on. In the BIOS settings, navigate to the "Boot" or "Advanced" tab and select the USB drive as the first boot device.
You can get your Toshiba laptop to boot from USB, but you may face issues such as a black screen, system corruption, or hard drive failure that prevent proper booting. However, booting your Toshiba laptop via USB is still possible.
To create a bootable USB drive for utilities or other operating systems, you'll need to prepare the process by downloading the ISO file of the desired operating system or utility, such as Windows or a Linux distribution, and then using a tool like Rufus or Etcher to create a bootable USB drive from the ISO file. Ensure the USB drive is empty and has enough storage space to accommodate the ISO file. Follow the tool's instructions to select the ISO file and the USB drive, and let the process complete.
💡Download the ISO file for Windows.
- Windows 10: https://www.microsoft.com/en-us/software-download/windows10
- Windows 11: https://www.microsoft.com/en-us/software-download/windows11
If you're having trouble downloading the Windows 11 or Windows 10 ISO file, you can visit the provided link to find a solution.
💡Prepare a USB hard drive with at least 16GB of free space and format it as FAT32.
💡Download ISO Burner - Qiling Disk Master for Windows.
Qiling Disk Master is a tool specifically designed for Toshiba that simplifies the process of burning Windows ISO files and creating bootable USB drives. With its built-in tools, you can easily burn an ISO file to a target USB and make it bootable with just a few clicks, making it suitable for use with Windows 11/10/8.1/8/7 and Windows XP/Vista.
How to Get Toshiba Laptop to Boot from USB
To get a Toshiba laptop to boot from USB, you can follow these steps: First, ensure that the USB drive is formatted to FAT32 and has the bootable operating system installed. Next, enter the BIOS settings by pressing the key (usually F2, F12, or Del) as the laptop boots up. In the BIOS settings, navigate to the Boot Order or Boot Priority section and set the USB drive as the first boot device.
- Step 1. To prepare a USB drive, start by plugging it into your computer. Then, format the drive using the FAT32 file system. This will erase all data on the drive, so make sure to back up any important files first. Next, use a tool such as Rufus or Disk Utility to create a bootable USB drive.
- Step 2. Create a bootable USB for the Toshiba laptop.
- Step 3. To boot a Toshiba laptop, you need to access the BIOS settings, which can usually be done by pressing the F12 or F2 key during startup, as these are the typical boot menu keys for Toshiba laptops.
- Step 4. To change the boot order of your Toshiba laptop, you'll need to set the laptop's internal drive as the primary boot device. This can usually be done by entering the laptop's BIOS settings, which can be accessed by pressing a specific key (such as F2, F12, or Del) as the laptop boots up. Once in the BIOS settings, look for the boot order or priority section and select the internal drive as the primary boot device.
- Step 5. Boot Toshiba laptop from USB.
However, to make things easier, we simplify this process and divide it into three stages. This process can be broken down into detailed guides on the three stages, making it more manageable.
Stage 1. Format the USB to FAT32
To prepare a USB disk with at least 16GB of free space, format the USB flash drive as FAT32. This involves connecting the USB drive to your computer, opening the File Explorer or Disk Management tool, selecting the USB drive, and clicking the "Format" button. In the Format window, select FAT32 as the file system, choose a volume label, and then click "Start" to begin the formatting process.
Step 1. Connect the USB drive to your PC. Make sure to back up your important files beforehand, as this process will erase all data on the drive.
Step 2. To open the file explorer and access your USB drive, press the Windows + I keys, then right-click on your USB drive and select the correct drive to avoid data loss.
Step 3. To format a USB drive, select the "Format" option, choose FAT32 as the file format, and click "Start" to initiate the process.
If you encounter any issues during the process, you can click on the provided links to access additional information and guidance to help you overcome them.
Stage 2. Create Bootable USB
Before starting, ensure you have downloaded the correct ISO file and have Qiling Disk Master installed on your Toshiba Laptop. If you haven't, you can download this reliable ISO burning tool by clicking the button.
- Tip
- To create a Windows bootable USB, connect the prepared USB to your computer and use the Media Creation Tool or third-party tools to follow the instructions to make it bootable, or follow the guide to burn the Windows ISO file to USB to reinstall the system.
Here is how to use Qiling Disk Master to burn Toshiba Laptop ISO file to the USB in a nutshell:
Step 1. To create bootable media, launch Qiling Disk Master and go to the Tools section, then click "Create bootable media".

Step 2. Select the target USB as the destination and click "Proceed" to execute the operation.

This software, besides burning ISO to USB, can also be used to set up USB drives for various purposes, such as creating a bootable USB, installing an operating system, or even making a portable app.
- Burn ISO to DVD
- Burn Windows 7 ISO to USB
- Burn ISO to USB on Windows 10
- Boot From USB on Windows 11
- Check USB flash drive speed
- Boot from USB on HP laptop
- Create bootable USB
- Boot Lenovo laptop from USB
If you're looking for a reliable tool to burn Windows ISO files, don't miss out on this one. It's a trustworthy option that can help you get the job done efficiently.
To boot a Toshiba computer normally from USB or reinstall Windows, you need to change the boot sequence in the BIOS to prioritize the USB drive.
Read Also:

The Sony VAIO Boot Menu is a feature that allows users to boot their computer from a USB device, such as a flash drive or external hard drive, instead of the internal hard drive. This can be useful for troubleshooting, reinstalling the operating system, or running a different operating system from a USB drive. To get the Sony VAIO Boot Menu, users typically need to press a specific key combination during the boot process, such as F2, F3, or F11, depending on the model and configuration of the computer. Once in the Boot Menu, users can select the USB device as the boot device and save the changes.
This guide shows you how to access the Sony VAIO boot menu and use the Sony BIOS key to boot your laptop from a USB drive, including Sony laptops.

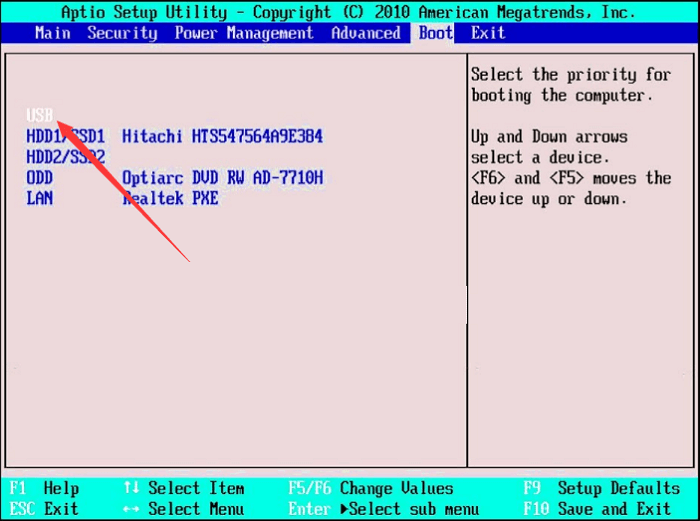
Stage 3. Change the Boot Order on Toshiba Laptop
Connect the bootable USB to your Toshiba laptop, turn it on, and immediately enter the BIOS by pressing the designated key (usually F2, F12, or Del). Change the boot order to prioritize the USB drive, then save and exit the BIOS. Your laptop should now boot from the USB. If prompted, select the USB drive as the boot device. If the laptop doesn't boot, try booting in safe mode or checking the USB drive for errors.
Step 1. To enter the BIOS setup on a Toshiba laptop, you need to quickly press the key (usually Del or F2) before the screen disappears.
Step 2. After entering the BIOS setup, go to the Boot tab and select the target USB drive as the first boot device.
There is no link provided. If the USB is not showing, the issue may be due to a driver problem or a hardware issue.
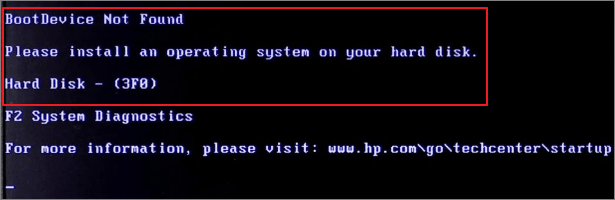
[Fixed] Boot Device Not Found Error in Windows 10/8/7
Boot device not found Unexpected errors can occur when starting your Toshiba, HP, Dell, or Lenovo laptop running Windows 10 or Windows 7.
Step 3. Save and exit the BIOS setup by pressing the "Save and Exit" button, usually located on the keyboard, such as F10. This will save the changes made to the BIOS settings and exit the setup menu.
- Notice:
- After changing the boot sequence, your Toshiba laptop will automatically boot from USB. To restore the original boot priority, simply shut down your device and remove the bootable USB.
Conclusion
Toshiba laptops make our work, life, and entertainment easier, but system corruption, hard drive failure, or other issues can prevent them from starting properly. This article guides you through downloading the correct ISO file and burning it to the corresponding USB, providing a solution to get your Toshiba laptop or PC up and running again. If you find this tutorial helpful, consider sharing it with others to assist them in resolving similar issues.
Get Toshiba Laptop to Boot from USB FAQ
Knowing how to get a Toshiba laptop to boot from a USB can be a lifesaver in certain situations. If you're facing issues with this, you're not alone - some common problems include.
1. How to boot a Toshiba laptop from a USB on Windows 10?
To make a Toshiba laptop boot from a USB, download the Windows 10 ISO file on a PC, burn it to a FAT32-formatted USB with at least 16GB free space, plug it into the laptop, restart, press F12 to enter BIOS, select the USB as the boot drive, save and exit.
2. What are the Toshiba Satellite boot menu keys?
To open the boot menu on a Toshiba Satellite laptop, press F2 or F12 when prompted on the startup screen. This will allow you to access the boot menu or BIOS settings.
3. How do I boot from USB on Toshiba Satellite BIOS?
To set the USB as the boot drive on a Toshiba Satellite, first download the correct ISO file on your PC and burn it to the target USB. Only then can you set the USB as the boot drive in BIOS. To do this, press F12 or F2 to enter BIOS, navigate to the Boot tab, choose the correct USB, save and exit.
Related Articles
- How to Split C Drive in Windows 11/10/8/7🔥
- How to Reset Windows 11 Password with USB - 3 Easy Tips
- Guide on Convert GPT to MBR with 3 GPT to MBR Converters
- How to Check USB Speed on Windows [100% Working Solution]
- How to Fix SSD Shows Up in BIOS But Not Windows Issue 💡
A situation where an SSD is recognized in the BIOS but not in Windows is a frustrating issue. Fortunately, this problem can be attributed to a few possible reasons, including loose connections, incorrect drive configuration, or a corrupted drive. - How to Run SSD SMART Test Safely [SMART Attributes Explained]
Do you know what an SSD SMART test is? How can you check the SSD health condition? Don't worry; This article guides you step by step on this topic.