How to Fix Select the Disk Where to Install macOS Blank
Explanation: Select the Disk Where to Install macOS Blank
The "select the disk where to install macOS blank" error occurs when the system asks to select the disk where to install macOS, but the internal drive is not visible, leaving only the external drive as an option. This issue can be caused by a variety of factors, including incorrect boot order, corrupted boot sector, or issues with the installation media. To resolve this issue, users can try resetting the System Management Controller (SMC) and the Power Management Unit (PMU), or booting from a different drive. In some cases, reinstalling macOS may be necessary. It is recommended to back up important data before attempting any troubleshooting steps.
The "select the disk where to install macOS" error can be frustrating, causing a blank screen with no disk options. This issue can arise due to various reasons, and fortunately, there are several solutions that can help resolve it, providing a quick fix for anxious users.
For starters, you can re-If you're experiencing issues with your macOS, you can try downloading and creating a new installer, or use Disk Utility to verify and repair any disk problems. Alternatively, you can reset your NVRAM/PRAM and SMC, check that your Mac and macOS version are compatible, and ensure your firmware and system software are up to date.
How to Upgrade to macOS Sonoma
Apple typically reveals the major version of macOS at the WWDC event, sparking curiosity among users and developers. If you're looking to upgrade to macOS 14, this post provides guidance on how to do so.
Causes of Select Blank Disk Where to Install macOS
The "select disk where to install macOS blank" error can occur due to several reasons. This issue can arise when the installation process is unable to detect a valid disk to install macOS on, potentially due to a faulty disk or a disk that is not compatible with the installation process. Additionally, issues with the installation media, such as a corrupted installer, can also cause this error.
💾Cause 1. Corrupted or incompatible macOS installer
The "select disk where to install macOS blank" error is often caused by an incompatible macOS installer. To resolve this issue, it's essential to ensure that the macOS you want to install is compatible with your system and that the installer is not corrupted, which can be checked by downloading it from the official website.
💽Cause 2. A disk format or partition issues
Partition and disk formatting issues can also cause disk errors. If you're experiencing problems, using Disk Utility to check, identify, and repair any issues is essential. This can help resolve the issue and get your disk running smoothly again.
⚔️Cause 3. Software or hardware incompatibility
The "select disk where to install macOS blank" error can also occur due to hardware and software incompatibility. This means that the macOS software is not compatible with the hardware you are trying to install it on, leading to multiple problems. It's essential to check the list of compatible devices before upgrading the system to avoid this issue.
📱Cause 4. Outdated firmware or system software
Keeping the system up-Regularly updating firmware and checking for system updates is crucial to prevent disk errors and ensure a smooth macOS upgrade process. By doing so, you can avoid potential issues and keep your system up-to-date. This proactive approach can save you from frustrating disk errors and ensure a seamless upgrade experience.
5 Ways to Fix the Select Disk Where to Install macOS Blank
Are you anxious about the "select disk where to install macOS blank" error? Don't worry, five fixes can help you overcome the issue, letting you proceed with installing macOS without the blank disk selection screen.
- Method 1. Re-download and create a new macOS installer
- Method 2. Verify and repair disk issues using Disk Utility
- Method 3. Reset NVRAM/PRAM and SMC
- Method 4. Ensure compatibility with your Mac and macOS version
- Method 5. Update firmware and system software
To avoid losing important data, back up your files using Deep Data Recovery for Mac Pro before installing or updating macOS.
Back Up Your Mac and Never Lose Data
You can back up and restore your MacBook/iMac without relying on Time Machine, iCloud, or external hard drives. To do this, you can use the built-in "About This Mac" feature to create a backup of your computer's system information, user accounts, and other settings.
Method 1. Re-download and create a new macOS installer
One of the best ways to fix the "select disk where to install macOS blank" error is to re-download and create a new macOS installer. For that, you need to follow the steps given below.
How to re-download the macOS installer?
Here are the steps –
Step 1. Visit the App Store.
Step 2. Search for macOS Ventura (or the version you are on)
Step 3. Once you find the file, click on the "View" or "Get" button.
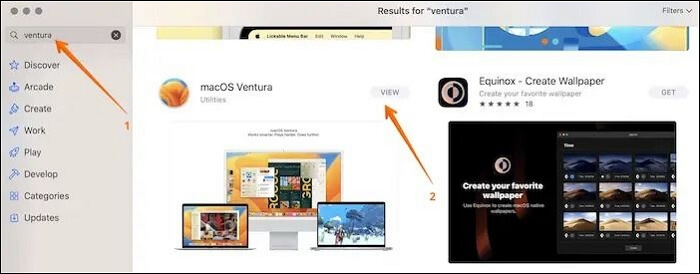
Step 4. From here, you can re-download the macOS installer.
How to create the new bootable installer?
Check out these steps –
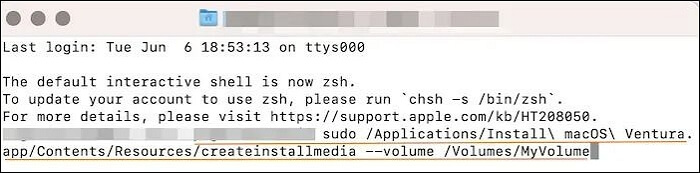
Step 1. Connect the USB drive to the system.
Step 2. Open "Terminal".
Step 3. Type - sudo /Applications/Install\ macOS\ Ventura.app/Contents/Resources/createinstallmedia --volume /Volumes/MyVolume.
Remember that you need to type the name of the downloaded macOS.
Step 4. Press "return".
Step 5. Enter the admin password.
Step 6. To erase the volume, enter Y.
Step 7. Hit "Return".
Step 8. A pop-up appears, asking for permission to access files on the removable volume. Press the "Ok" button.
Step 9. Close the Terminal.
Step 10. Disconnect the drive.
Method 2. Verify and repair disk issues using Disk Utility
To fix drive-If you encounter errors on your Mac, you can use Disk Utility to resolve them. The First Aid feature within Disk Utility inspects and repairs any issues, helping to get your Mac running smoothly again. To use First Aid, simply follow the steps outlined in Disk Utility to inspect and repair any problems, and your Mac should be back to normal in no time.
Step 1. Enter the macOS Recovery Mode.
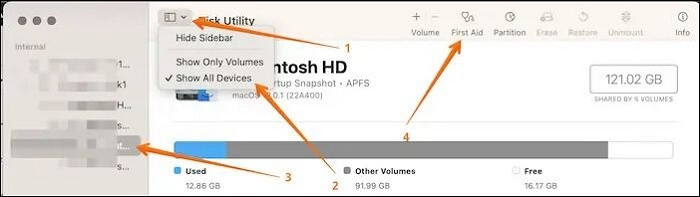
Step 2. From the utility screen, choose "Disk Utility".
Step 3. Select the "View" button.
Step 4. Go to "Show All Devices".
Step 5. Click the "First Aid" button.
Step 6. Press "Run" when you are asked for confirmation.
Step 7. Choose "Continue".
Step 8. Now install macOS and see if the problem persists.
You can move on to the next solution if this doesn't fix the issue. Don't forget to mark this guide by sharing it on Facebook, Twitter, or SNS.
Method 3. Reset NVRAM/PRAM and SMC
Resetting the NVRAM/PRAM and SMC on your Mac can help resolve disk errors by clearing out any corrupted data and resetting the system management controller, which can sometimes cause issues with disk access. This process can be done by pressing the power button, then immediately holding down the Command (⌘) + Option (⌥) + P + R keys for 10 seconds.
Here are the steps to reset NVRAM/PRAM –
Step 1. Turn off the system.
Step 2. Press the "Power" button.
Step 3. Press the "Cmd, Option, P, and R" buttons simultaneously.
Step 4. When you hear the startup chime for the second time, release the keys.
For T2-On Macs, you must wait until the Apple logo comes and goes for the second time before releasing the keys.
Apart from that, you can also reset SMC. However, the steps to reset it vary based on the model.
For Macs with T2 security chip –
Step 1. Turn off the system.
Step 2. Press the power button for a few seconds and hold it. This will initiate the shutdown process.
Step 3. Restart the system.
Step 4. If that doesn't work, turn off the device again.
Step 5. To perform this action, press and hold the left Option key, the right Shift key, and the left Control key simultaneously.
Step 6. Now, press the Power button and hold it at the same time.
Step 7. After a few seconds, release the keys.
Step 8. Restart the macOS.
For desktop Macs –
Step 1. Turn off the system.
Step 2. Remove the power cord.
Step 3. After a few seconds, reconnect it.
Step 4. Turn on the device.
For Macs with a removable battery –
Step 1. Turn off the system.
Step 2. Take out the battery.
Step 3. Press the power button and hold it.
Step 4. Put in the battery.
Step 5. Turn on the system.
For Macs with a non-removable battery –
Step 1. Turn off the system.
Step 2. Press the left Shift, Option, and Control keys and hold them. This is a keyboard shortcut that can be used to take a screenshot on a Mac.
Step 3. Press the Power button and hold it at the same time.
Step 4. Release the keys after a few seconds.
Step 5. Turn on the system.
Method 4. Ensure compatibility with your Mac and macOS version
To fix the error, check the compatibility of your Mac and macOS version with the software by visiting Apple's support page, where you can find details on system compatibility, giving you a better understanding of the software-hardware compatibility.

If your Mac is unable to update, try restarting it, checking your internet connection, and ensuring the App Store is set to update automatically. You can also try deleting the App Store cache, resetting the System Management Controller (SMC), or booting in Safe Mode.
How do I update my Mac when it says no update? Here are possible solutions that can help you. Read more >>
Method 5. Update firmware and system software
To resolve the error, you can try updating the firmware and system software. This can be done by following a series of steps, which may include restarting the device, accessing the settings menu, and selecting the option to update the firmware and system software. This process may take some time to complete, but it may resolve the error and get the device functioning properly again.
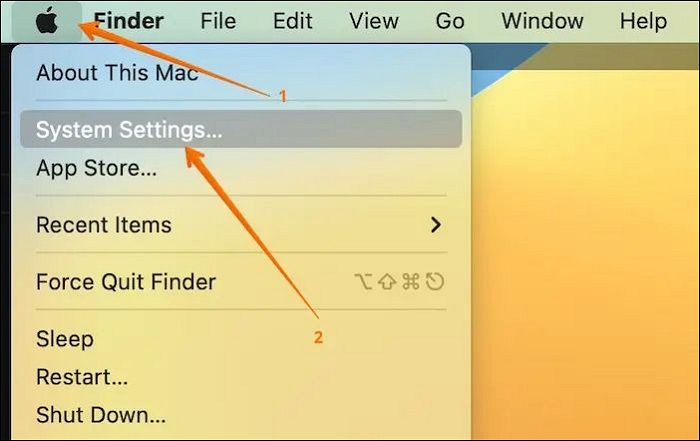
Step 1. Go to "Apple Menu".
Step 2. Click on System Settings or System Preferences.
Step 3. For System Settings users, select "General" and choose "Software Update".
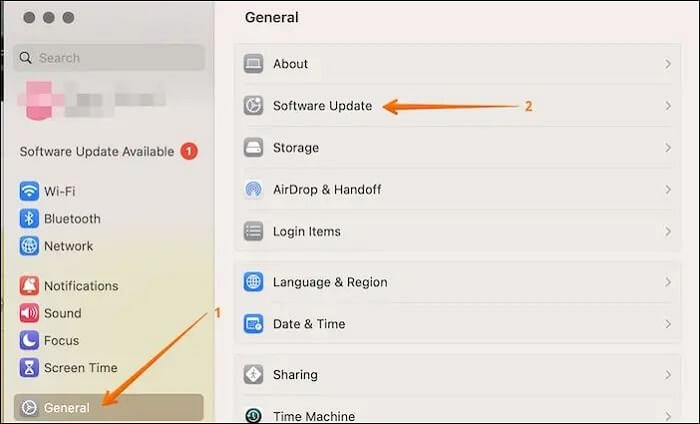
Step 4. For System Preferences users, click on Software Update.
Step 5. If there is any update available, you will see an "Upgrade Now" option. Click on it.
You can also use the Recovery Mode to update the firmware option.
For that, here are the steps –
Step 1. Enter the macOS Recovery Mode.
Step 2. Choose "Reinstall macOS".
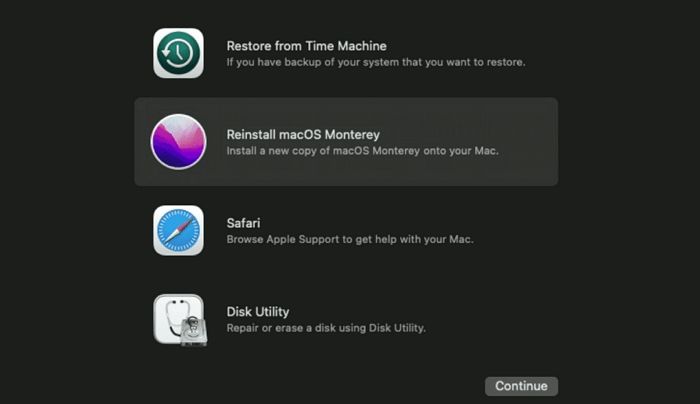
Step 3. Click "Continue".
How to Recover Lost Data After Installing macOS
If you've lost data after upgrading to the latest macOS, even after following procedures carefully, don't worry - you can recover your lost data with the help of professional data recovery software, such as Deep Data Recovery for Mac.
The Deep Data Recovery for Mac is a powerful and reliable tool that can retrieve various types of data, including photos, videos, emails, audio, and more.
Deep Data Recovery for Mac can be used in various scenarios, including recovering lost or deleted files, photos, and other data from a Mac's hard drive, external drive, or other storage devices. It can also help recover data from a Mac that won't boot or is experiencing startup issues, and can even recover data from a Mac that has been formatted or reinstalled. Furthermore, it can recover data from a Mac that has been damaged by a virus or malware, or has experienced a power surge or other hardware failure.
- Malware attacks can be devastating, but a recovery tool can help restore lost data and recover from a system wipe.
- Formatting a drive can sometimes lead to data loss, but with the right tool, you can recover data from a formatted hard drive on a Mac.
- Issues with macOS installation can cause data loss during the restoration process.
- Physical damage to the hard drive or other software-related issues can cause data loss, but using this tool can help restore data.
Here are the easy steps to use Deep Data Recovery for Mac:
Note: To create a backup, click on "Disk Backup" on the left, which will allow you to recover data in case of disk damage or accidental deletion.
Step 1. Select the location
After updating to macOS Sonoma/Ventura/Monterey/Big Sur, select the disk where you lost data. Then, click "Search for lost files".

Step 2. Find lost data after the scan
Deep Data Recovery for Mac scans the selected disk volume, displaying the results in the left pane, allowing users to find specific data using file type and file path.

Step 3. Recover data after macOS update
Select the target files that were unknowingly lost during or after the update, and click the "Recover" button to retrieve them all.

Conclusion
The "select the disk where to install macOS blank" error is a frustrating Mac problem that can be resolved with multiple solutions. One approach is to verify and repair any problems using Disk Utility, which may resolve the issue. Alternatively, resetting the System Management Controller (SMC) can also be tried to see if the error is resolved.
Data loss can occur when applying some solutions, but Deep Data Recovery for Mac is a reliable and user-friendly recovery software that allows users to recover different data types.
Select Disk Where to Install macOS FAQs
To know more about Select Disk Where to Install macOS, what are the questions and answers listed here?
1. How do you select the disk where to install macOS?
Users installing macOS typically choose to install it on the Macintosh HD disk.
2. Why I can't see the disk to install the macOS?
You may not be able to see the disk to install macOS due to various reasons such as the device's macOS incompatibility, corrupted macOS installer, or disk format/partition issues.
3. How do I reinstall Mac from a blank hard drive?
Here are the steps to reinstall Mac from a blank hard drive in one paragraph:
- Enter the macOS Recovery Mode.
- From the Utility menu, choose Disk Utility.
- Choose the external drive, and then press the Erase button.
- Opt for GUID in the partition scheme.
- Enter volume name and format type (AFPS).
- Select Apply, and then click Done.
- Close Disk Utility.
- Go to install OS and follow the on-screen instructions.
4. How to install macOS on a blank MacBook?
To install macOS on a blank MacBook, follow these steps –
- Connect the bootable installer.
- Turn off the device, and then Press the Power button.
- In the startup options window, select the bootable installer volume.
- Select Continue, and when the macOS installer opens, follow the on-screen instructions to complete the installation.
Related Articles
- 5 Ways to Fix the 'Device Doesn't Support Miracast' Error in Windows 11
- Top 2 Ways | How to Create Bootable USB from ISO Windows 10
- 8 Fixes for WD External Hard Drive Slow Transfer Rate in 2024 [New]
- [Tips] AutoSave Is Greyed Out or Not Working in Office, Word, Excel
- How to Factory Reset Microsoft Surface with Every Possible Way
Learn how to factory reset Microsoft Surface safely. Use Windows settings, recovery options, or reset methods while protecting data. - [Full Guide] How to Factory Reset PC Without Turning It On
Make your PC brand new and super fast with the help of factory reset settings. Learn different methods and techniques for how to factory reset pc without turning it on. Also, find out details of EasyUS software to create a backup in your window before the factory reset.