How to Stop Mac from Sleeping: Full Information to Prevent Mac from Sleeping
How to stop Mac from sleeping? Here are some possible solutions that may help you:
| Workable Solutions | Step-by-step Troubleshooting |
|---|---|
| Fix 1. How to Stop Mac from Sleeping on macOS | Sleep mode on Mac is a built-in feature, so you may control how it's triggered. However...Full steps |
| Fix 2. Preventing Mac from Sleeping When Display Is Off | Hit the Apple symbol, which is located on the top-left edge of the Mac's menu bar. After that, hit...Full steps |
| Fix 3. How to Prevent Mac from Sleeping in Terminal | The Mac Terminal app needs to be opened. Type "Caffeinate". Hit the Enter button...Full steps |
| To schedule specific times for your Mac to sleep, you can use the Energy Saver preferences in System Preferences. Here's how: go to System Preferences, then click on Energy Saver. In the dropdown menu, you can choose from several options: "Preferably," "Immediately," or "Never. | Hit the Apple symbol on the upper-left edge, and opt for preferences. Hit "Energy Saver"...Full steps |
Why Does Mac Go to Sleep
When you're not using your Mac for a minute or two, the screen dims, the screensaver activates for 10 minutes, and then goes black, entering sleep mode. This doesn't shut down all processes, so you can still receive notifications and background activities continue, like checking your mail. To wake it up, just press a button or the screen, and it quickly comes back to life.
Your Mac is designed for maximum power efficiency, so it automatically goes to sleep when you stop using it for a certain period. This is to extend its battery life. When you're not actively using your Mac, it will try to conserve energy by entering sleep mode, allowing you to save battery life.
Are you wondering how to stop Mac from sleeping? Below are the top best methods to prevent Mac from sleeping. Before reading the whole method, you can share this guide to mark it.
How to Stop Mac from Sleeping [2 Methods for macOS]
Sleep mode on Mac is a built-in feature, so you may control how it's triggered. However, the process will vary based on your macOS version.
How to Stop Mac from Sleeping on macOS Big Sur or Later
In macOS Big Sur and Monterey, you can control sleep mode by setting different options for when the Mac is plugged in (power adaptor) versus running on battery. This can be found in System Preferences > Battery.
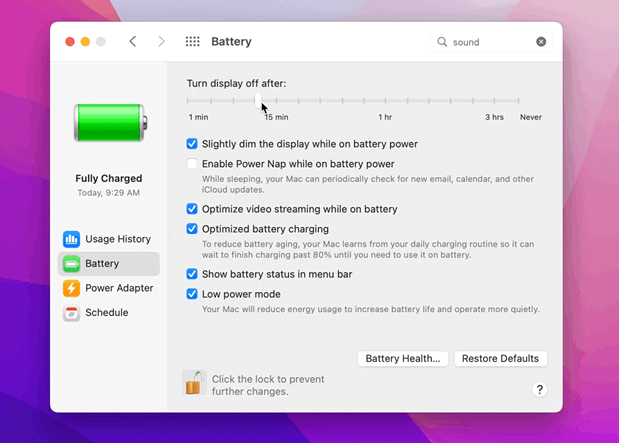
To prevent your Mac from sleeping when it's disconnected from power, go to the battery settings, click on the battery section, and drag the "Turn display off after" slider to "Never".
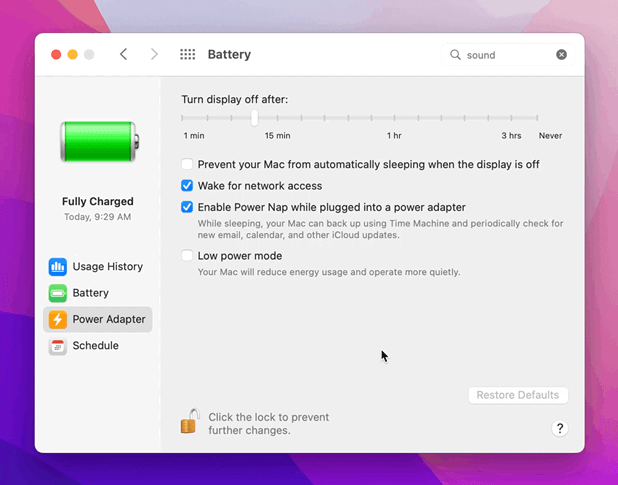
To prevent your Mac from sleeping when it's plugged in, go to System Preferences, then Power Adaptor, which can be found under Battery Settings.
To prevent your Mac from sleeping automatically when the display is off, tick the box "Prevent your Mac from sleeping automatically when the display is off." Then, adjust the "Turn display off after" setting by moving the slider.
How to Stop Mac from Sleeping on macOS Catalina or Older
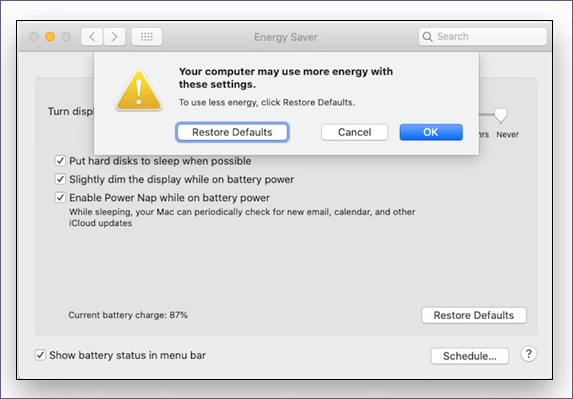
Energy Saver is an option in System Preferences that helps conserve power on older macOS systems, such as macOS Catalina. On newer systems, it has been replaced by the Power Adaptor and Battery sections, with a different user interface. The Energy Saver feature can automatically turn off the screen after a set period of inactivity, and users should be aware of a few settings to consider.
- Keep the hard drives to sleep whenever possible.
- Dim the display a little bit while on battery power.
- Toggle power nap on while the Mac's on battery power.
- Stop the PC from sleeping automatically when the display shuts down.
A power nap, in this context, means letting your Mac back up to Time Machine and syncing calendar, email, and iCloud while it's in sleep mode. This process is triggered by the Mac's sleep function, which allows it to conserve power and automatically resume from where it left off.
To prevent a Mac from sleeping, move the "Turn display off after" slider to the right to "Never" and confirm the change. This will keep the Mac awake indefinitely.
Preventing Mac from Sleeping When Display Is Off
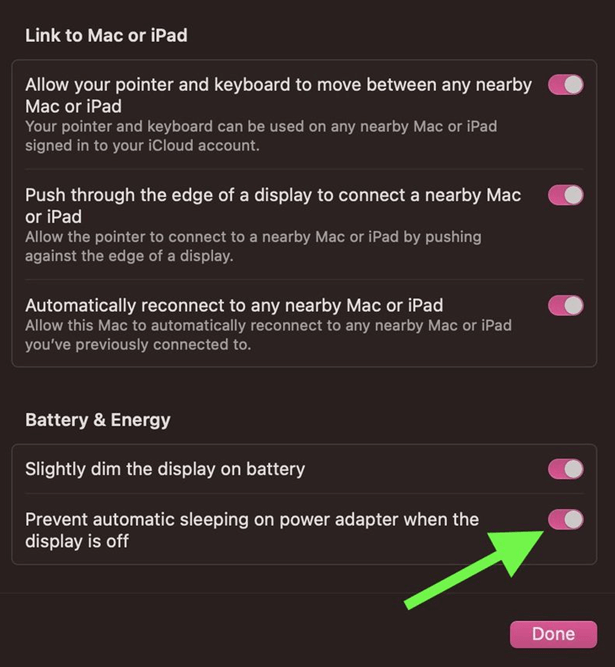
If you've noticed that your Mac sleeps when the display is off after a certain time, it's because of macOS' default behavior. However, you can prevent your Mac from sleeping by following these steps.
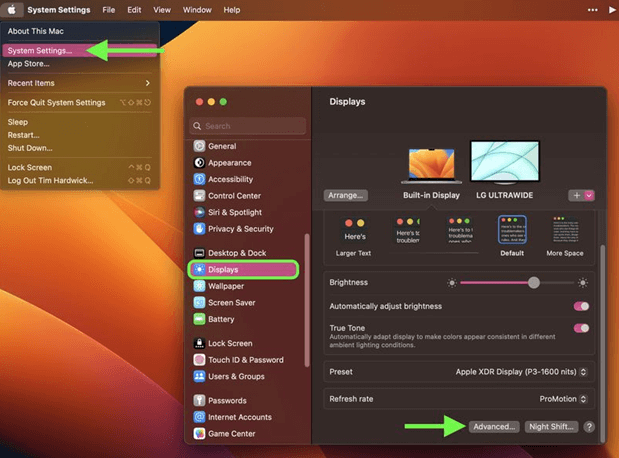
Step 1. To access System Settings on a Mac, click the Apple symbol located on the top-left edge of the menu bar, and then select System Settings from the dropdown menu.
Step 2. The Displays option is used to configure the display settings of your computer. This includes settings such as resolution, orientation, and whether to use the built-in display or an external monitor.
Step 3. Hit the "Advanced" button.
Step 5. To prevent your laptop from automatically sleeping when it's plugged into a power adapter and the display is off, you need to toggle on the switch adjacent to "Prevent Automatic sleeping on Power Adapter when the display is off" in the "Battery & Energy" section.
Step 6. Select "Done".
To change the Mac display mode, you can also use the Displays Settings window, where you can select from various display modes.
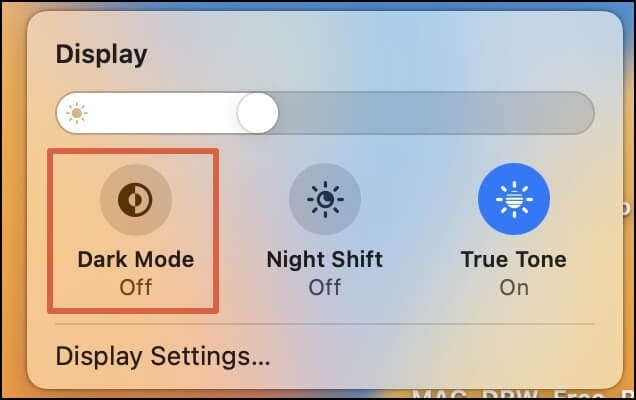
How to Make Mac Dark Mode [for macOS Ventura/Monterey/Big Sur]
To enable Mac Dark Mode, there are three ways to do so, and you can also access it through System Settings.
How to Prevent Mac from Sleeping in Terminal
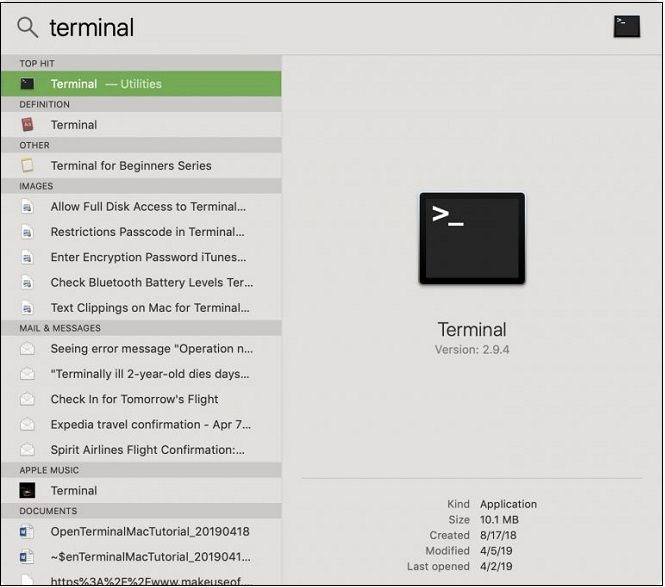
To prevent your Mac screen from shutting off during a vital task, you can keep it on by using a Terminal command. This approach avoids the power usage and wear and tear associated with turning off sleep mode. By following a simple set of steps, you can ensure your Mac screen stays active and focused on the task at hand.
Step 1. The Mac Terminal app needs to be opened.
Step 2. Type "Caffeinate".
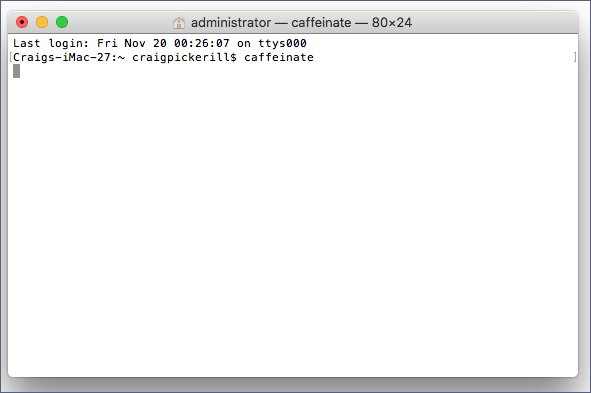
Step 3. Hit the Enter button.
Step 4. As long as the Terminal window is visible, your Mac appears on the screen.
Step 5. To disable caffeinated mode and close the Terminal window, hit the "Terminate" button on the alert that appears. This will stop the Terminal from running and allow you to close the window.
Step 6. Once you shut down the Terminal window, your Mac will enter sleep mode per your Energy Saver settings.
You can check this guide to learn more Terminal skills:
Change Directory in Terminal Mac | Get All Information Here
To change directory in Terminal on Mac, simply type "cd" followed by the name of the directory you want to navigate to. For example, to navigate to the "Documents" folder, you would type "cd Documents" and press enter. You can also use "cd ~" to navigate to your home directory, and "cd /" to navigate to the root directory.
How to Schedule Specific Time for Mac to Sleep
To schedule your Mac to sleep automatically, go to System Preferences > Energy Saver > Schedule and select the desired time interval for your Mac to sleep. You can choose from options such as 1 minute, 2 minutes, 3 minutes, and so on, up to 1 hour. Additionally, you can also select the option to "Prevent computer from sleeping automatically when the display is off" to ensure that your Mac enters sleep mode even when the display is turned off. This way, you can balance the need for automatic sleep with the need for your Mac to enter sleep mode when you're not using it normally.
Step 1. To access the preferences on a Mac, you can click on the Apple symbol located in the upper-left corner of the screen. From the dropdown menu, select "System Preferences" to open the preferences window.
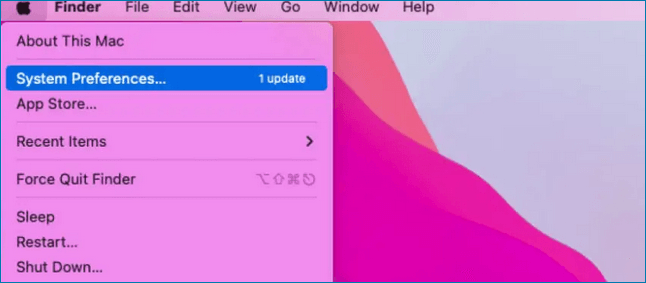
Step 2. Hit "Energy Saver".

Step 3. Opt for "Schedule."
Step 4. Select the Sleep checkbox.
Step 5. Hit "Everyday", and opt for "Weekdays", "Weekends," "Everyday", or a particular day of the week.
Step 6. Go to System Preferences > Energy Saver > Schedule > Sleep Now. Choose the time you would like your Mac to enter sleep mode.
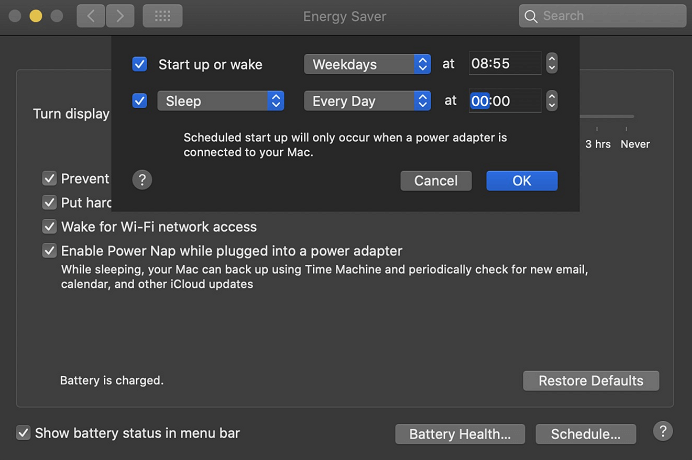
Step 7. Your MacBook will automatically sleep at the day and time you choose.
How to Prevent Data Loss While Using Mac Sleep Mode
A superior retrieval program for Mac can save infinite information with easy steps and recover any lost information from the empty Trash Bin, unintentional elimination, or other sources, including images, movies, audio files, records, emails, and more from various devices such as HDD, SSD, fusion drives, Time Machine backup drives, memory cards, USB drives, cameras, and others.
Despite not having a Time Machine backup, 79% of Apple users installed the data recovery wizard to restore destroyed files on Macs. The top highlights of this tool include: (Note: I removed the "shortly" part as it's not clear what it refers to)
- Photo recovery software can recover deleted photos on Mac and from digital cameras, SD cards, and other devices.
- If you accidentally deleted Time Machine backups, you can quickly recover them with Qiling, a backup recovery solution that helps you restore lost data.
- You can easily recover deleted or lost movies, screen recordings, and family videos on Mac through video recovery. This allows you to retrieve files that were mistakenly deleted or lost due to various reasons.
Download the latest Deep Data Recovery for Mac to recover lost files on your Mac device.
Step 1. Select the location to scan
Launch Deep Data Recovery for Mac, select the storage device where data was lost, and click "Search for lost files" to begin scanning.
Note: Before attempting data recovery, it's recommended to create a backup of your Mac by clicking "Disk Backup" from the left sidebar. This precautionary step ensures that your data is safely backed up, allowing the software to recover data from the backup if needed, and enabling your computer to write new data again.

Step 2. Filter lost Mac data
The software automatically scans for lost data on MacBook/iMac, and once the scan is complete, users can filter the wanted data using the "Type" and "Path" buttons.

Step 3. Recover lost data or files
Double-Click a file to preview it, then click the "Recover" button to restore the lost data to another location.

Summary
To prevent your Mac from going to sleep while working on a project, you can use various techniques and programs. For example, you can adjust the display settings to keep the screen on for a longer period or use third-party apps like Caffeine or Stay Awake to keep your Mac active. This allows you to customize the standby times according to your needs and preferences, ensuring that your Mac remains active and focused on the task at hand.
You may encounter certain issues, especially if you're a new Mac user getting accustomed to macOS. Fortunately, you can easily navigate through most of them.
Hopefully, you have understood how to stop Mac from sleeping. If you have lost data while using Mac sleep mode, you can download Deep Data Recovery for Mac to prevent further data loss.
How to Stop Mac from Sleeping FAQs
Consider the below-mentioned FAQs to comprehend the topic better:
1. How to fix macOS Ventura WindowServer to prevent it from sleeping?
To prevent a Mac running macOS Ventura from sleeping, you can follow these steps:
- Liberate some storage space.
- Verify if your MacBook is operating on macOS 13 or not.
- You must have a stable internet ecosystem.
- Reinstall macOS Ventura in its recovery mode.
2. How to stop my Mac screen from going to sleep?
To stop your MacBook screen from going to sleep, go to Apple menu > System Settings, then hit 'Energy Saver' in the sidebar.
3. How do I turn off screen timeout on MacBook Air?
With the below-mentioned steps, you can turn off screen timeout on MacBook Air:
- Opt for Apple menu > System Settings on your Mac.
- Hit Screen Time in the sidebar, and launch screen time settings.
- Select the pop-up menu on the right if you're using family sharing, then select yourself.
- Switch off the Screen Time.
4. How to turn off Mac Sleep Mode?
Follow the steps below to turn off the Mac sleep mode completely:
- Hit the Apple logo.
- Open battery.
- Make a quick adjustment to the settings.
Related Articles
- How to Fix "Convert GPT Grayed Out" Error in Windows [2023 New Fix]
- How to Clear Memory and Increase RAM in Windows 10/8/7?
- Should I Convert to Dynamic Disk and How to Do Dynamic Disk Convert
- Fixed: System Image Restore Failed, Windows Cannot Restore a System Image in Windows 10/8/7
- PowerShell Check If File Exists | 4 Examples
Do you want to check if a file exists using PowerShell? Then this post explains how to use PowerShell to check if a file exists. You can use this command inside a batch file or a script or in your program, and figure out if the path exists or not. - Tutorial on PowerShell Format Disk on Windows [Easiest Way]
Learn how to format a disk with PowerShell in Windows using Format-Volume, disk commands, and safe preparation steps.