Fix Delete Volume Greyed Out in Disk Management on Windows 7/8/10/11
Disk Management is a Windows feature that allows us to organize disk-based data. However, sometimes the "Delete Volume" option is greyed out, making it difficult to delete volumes or remove partitions from the disk. This guide will explore the reasons behind this issue and provide solutions to help resolve it.
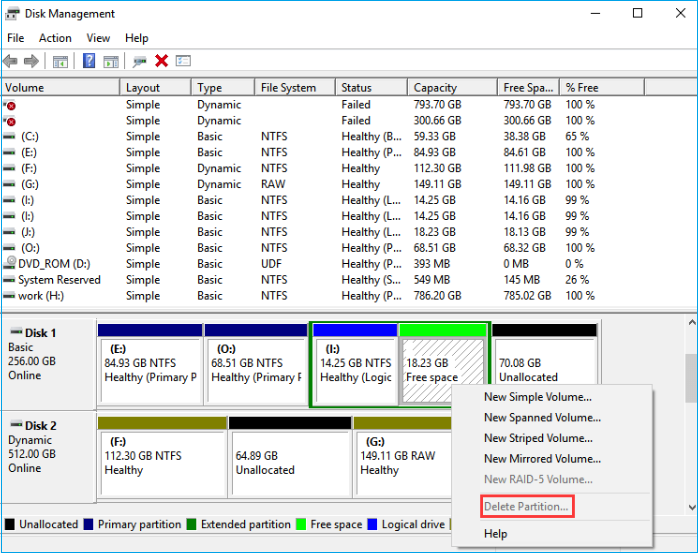
Why Is Delete Volume Greyed Out
Dealing with a Delete Volume Greyed Out issue on your Windows computer can be frustrating, especially when you've deleted all files in the partition, yet the disk still shows as occupied. This problem persists, leaving you wondering why it happens.
Here are the most common reasons for these errors:
- Operation System files: The Delete volume option would be unavailable if the partition being deleted contains the operating system files.
- Page file: Page files contain information from the RAM, stored on a hard disk volume. If you try to delete this volume, the "Delete partition" option won't be available due to the presence of a page file.
- Virtual memory files: The virtual memory files may be set on the partition, making the delete volume option unavailable.
- Second partition on the USB drive: A USB drive with a second partition cannot be deleted, as the deleted volume options are greyed out. To resolve the issue, you need to remove the second partition from the drive.
To fix the issue of water damage, you can start by identifying the source of the leak and stopping it. This may involve checking the roof, pipes, and other areas where water can enter the property. Once the leak is fixed, use a wet/dry vacuum or towels to remove as much water as possible. Then, use fans and dehumidifiers to dry out the area completely.
- Warning
- Be cautious when deleting the system partition, as it can cause the system to fail to boot if the operating system is deleted. To avoid this, make sure to backup all essential data before deleting any partitions.
How to Fix Delete Volume Greyed Out
To resolve the issue, four methods can be employed to remove the culprits and make the feature available for use. These methods can be detailed discussed to solve the problem.
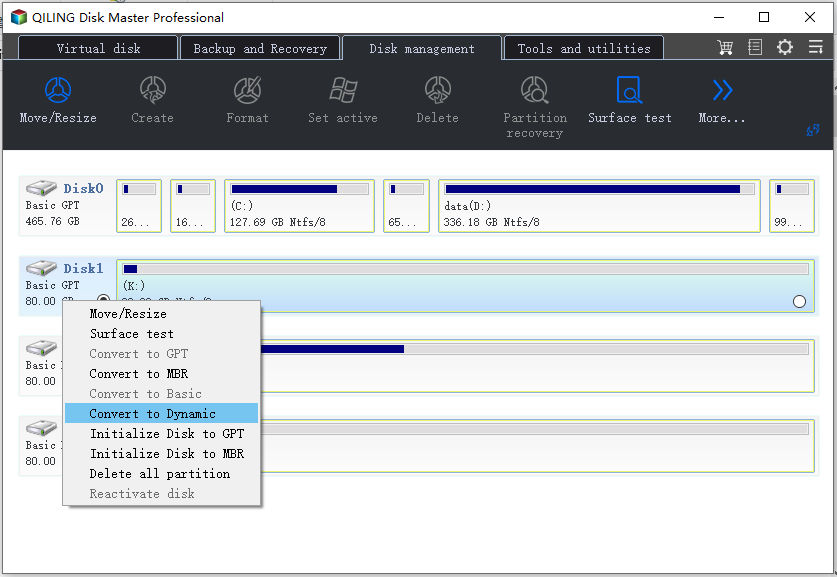
Method 1. Delete Partition Including System via Qiling Partition Master
When you have multiple partitions on your hard disk, you can delete them all at once using a free disk partition tool like Qiling Partition Master. This software is safe and easy to use, and it allows you to delete system partitions as well.
A newbie can also use it without any hassle. Here are the steps to follow:
Be sure to back up all important data before proceeding, as this will completely erase all existing partitions on the system disk, including the operating system.
Step 1. Launch Qiling Partition Master, go to the Partition Manager section, right-click your OS disk and select "Delete All" to delete all partitions on the disk.
Step 2. Are you sure you want to delete all partitions on the OS disk? This will erase all data on the disk, including the operating system and any installed programs.
Note: After this, you'll just need to wait patiently and Qiling Partition Master will automatically delete the OS drive and other data partition on your disk.
What Else Can Qiling Partition Master Do?
Qiling Partition Master is a powerful tool that can solve more problems with disk partition, including resizing, moving, merging, and splitting partitions, as well as backing up and restoring partitions, and even converting between different file systems, such as FAT to NTFS or vice versa. It also supports creating, deleting, and formatting partitions, and can handle issues like partition loss, disk corruption, and boot problems. Additionally, it has a built-in disk wipe feature that securely deletes all data on a disk, and a disk clone feature that allows users to clone an entire disk or a single partition to another disk.
- Delete NTFS partition
- Resize or move partitions
- Convert NTFS to FAT32 without data loss
- Extend the C drive to solve the "C drive full" error
Download Qiling Partition Master to enjoy more benefits and manage your disks and partitions better.
Method 2. Delete Partition via Diskpart
Here are the steps to delete partitions via Diskpart:
Step 1: To open the Command Prompt, go to the search box and type "Command Prompt" and click on the app to launch it.
Step 2: To access the disk management utility, open the Command Prompt and type "diskpart" followed by the Enter key to run the command.

Step 3: Type the following commands one by one and hit "Enter" after every command.
list disk
select disk 1 1. What is the purpose of the disk partition table?
list partition
select partition 11. Boot your system from the Ubuntu installation media.
delete partition
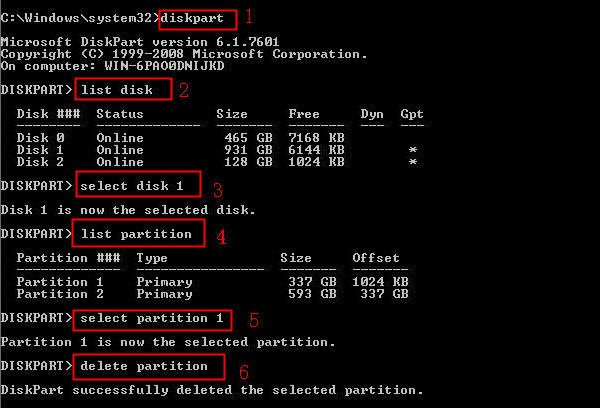
Step 4: Type "exit" to back to the desktop.
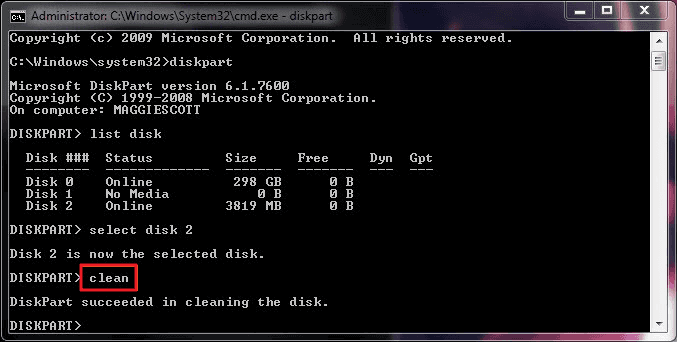
Diskpart is a tool with many features, but it requires careful command entry to avoid errors. It also allows for the deletion of all partitions, which should be done with caution.

To delete all partitions in Windows using DiskPart, first, open Command Prompt as Administrator, then type "DiskPart" and press Enter. Next, type "list disk" and press Enter to view a list of all disks, including removable media and CDs, DVDs, and USB drives. Select the disk that contains the partitions you want to delete by typing "select disk X", where X is the number of the disk.
This page explains what DiskPart is, what it can do in Windows PCs, and how to use it to delete partitions or clean the entire disk.
Method 3. Remove the Virtual Memory Partition
To remove the virtual memory partition, you can follow these steps: First, go to Control Panel, then click on System and Security, followed by System, and finally click on Advanced system settings. In the Performance section, click on Settings, and then click on Change under Virtual memory. Uncheck the box next to "Automatically manage paging file size for all drives" and select the drive where you want to remove the virtual memory partition. Set the initial and maximum size to 0, and then click on Set. This will remove the virtual memory partition from the selected drive.
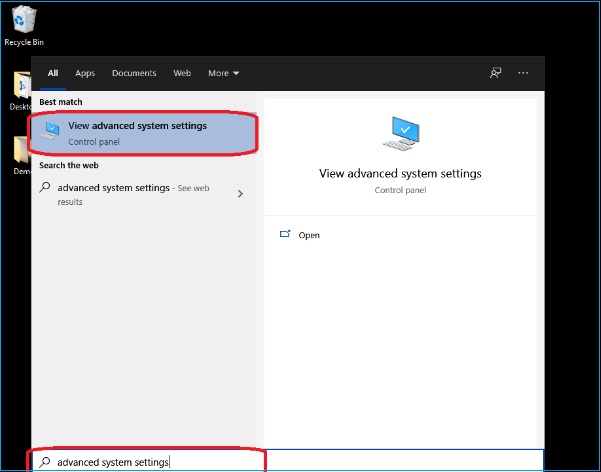
Step 1: To access the advanced system settings, go to the search box on your computer, type in "advanced system settings", and click on the result to launch it.
Step 2: Select the "View advanced system settings" option.
Step 3: To access advanced settings, tap on the "Advanced" menu, then click the "Settings" button located under the "Performance" option.
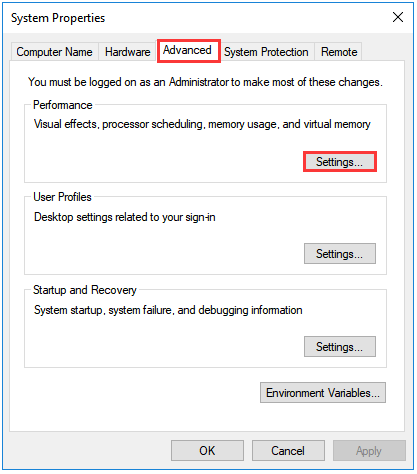
Step 4: To increase virtual memory, click the "Advanced" tab and select the "Change" button under the "Virtual memory" section.
Step 5: To disable automatic virtual memory management, go to the "Virtual Memory" menu, and uncheck the box that says "Automatically manage paging file size for all drives".
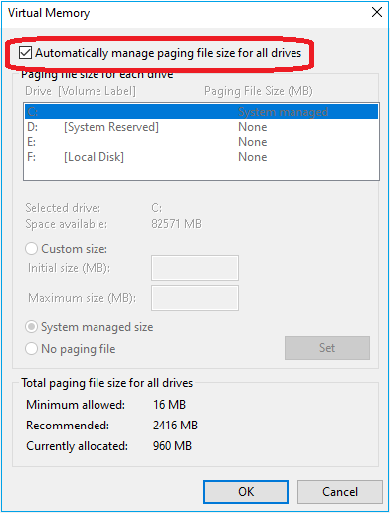
Step 6: To set the custom size of the Pagefile, select the "Custom size" option from the list and enter the minimum and maximum size of the Pagefile in megabytes (MB).
- Notice:
- The Pagefile size should be according to the physical memory.
Step 7: Click "No paging file", and "Set," then "OK."
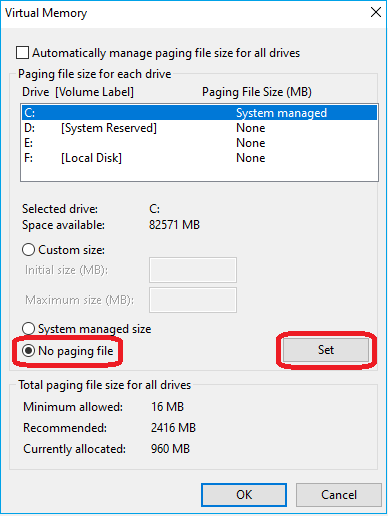
Once done, Restart your computer.
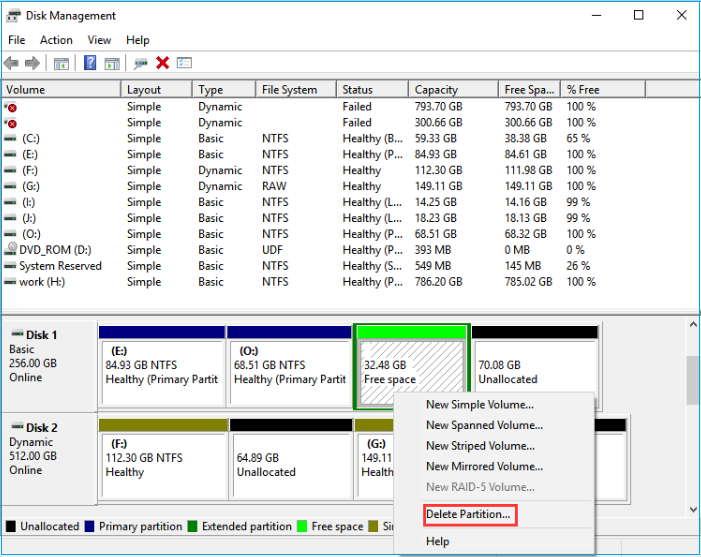
Method 4. Create New Volume to Delete Partitions in the Extended Partition
To enable the Greyed volume of a deleted partition, create a New Volume on the disk where the partition was located. Right-click on the disk and select "New Volume"
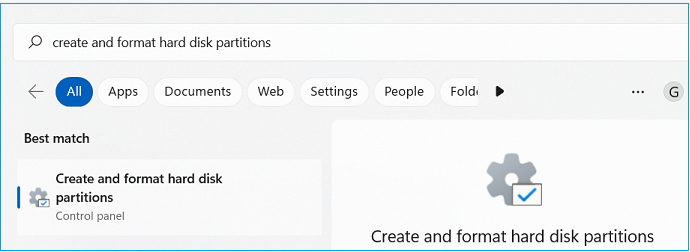
Step 1: In the Search bar, type "Create and format hard disk partitions" and click to open it.
Step 2: Right-click the "Free space" and select "Create New Volume."
Step 3: Confirm the changes.
Step 4: Right-click the newly created volume, and you will find the delete volume/delete partition option available now.
The "Delete Volume greyed out" problem has been solved in this article. If you're experiencing other Disk Management issues, a solution can be found by clicking the button below.
Conclusion
The article concludes by resolving the Delete Volume Greyed Out issue on Windows PCs. Four solutions are provided, allowing users to choose the one that suits their needs. The article encourages users to share which method worked for them and to share the article if they found it helpful.
FAQ of Delete Volume Greyed Out
We hope this article has provided you with all the essential information to fix the problem of Delete Volume Greyed Out. However, you can follow our FAQ section if you still have further questions.
1. Cannot delete disk volume?
If you're unable to delete a disk volume in Disk Management, it might be due to the presence of Page files or operating system files on the volume, or multiple virtual memory files, which would need to be removed before deletion is possible.
2. How do I enable delete volume in Disk Management?
If you're unable to delete a volume using Disk Management, you can use Qiling Partition Master to delete partitions or fix the issue. Alternatively, you can follow these steps to resolve the problem.
Step 1. To open the System Properties window, press the Windows key + R on your keyboard, then type "sysdm.cpl" in the Run dialog box that appears, and press Enter. This will open the System Properties window, where you can view and manage various system settings, including hardware, device drivers, and system files.
Step 2. To adjust the settings, go to the "Advanced" tab in the browser and click the "Settings" button under the Performance tab.
Step 3. Click "Advanced" from the menu and select "Change."
Step 4. To disable the automatic management of the page file, uncheck the box that says "Automatically manage paging file size for all drives" and select "No Page File" from the dropdown menu.
3. How do I fix the extended volume that is greyed out?
To fix the extended volume issue, such as being unable to extend volume in the C drive, create a new partition in Disk Management, which will enable all greyed-out options. Right-click on the free space and create a new volume, making the previously unavailable options available.
Related Articles
- Fixed: System Image Restore Failed, Windows Cannot Restore a System Image in Windows 10/8/7
- Quick Solutions to SanDisk SSD Not Showing up in Windows 11/10/8/7
- 6 Ways to Fix Windows Update Not Working Windows 11/10
- Hard Drive Not Spinning? Causes and Fixes Here!
- 6 Best Nintendo Switch SD Card: Everything You Should Know
What SD card is best for Nintendo Switch? This article will list five of the best Nintendo Switch SD cards and give detailed scale information to help you make a better choice. - All About Novo Button [2023 Full Guide]
This post is focused on the Lenovo Novo button. What is the Novo button? Where to find it? And how does the Novo button work? All the answers are shown in this post.