How to Repartition a Hard Drive on Windows 10/11 [Step-by-Step]
The demand for larger capacities and increased efficiency has led to a greater need for digital storage solutions. Repartitioning a hard drive can be a valuable skill for increasing storage or optimizing system performance, making it a useful tool for those looking to upgrade their digital storage capabilities.
By rearranging data allocation, you can create separate partitions for different purposes, such as separating the operating system from personal files or organizing data for dual-booting multiple operating systems. Qiling provides a guide on how to repartition a hard drive.
What Does Repartition Mean?
Repartitioning a hard drive involves dividing its storage space into multiple sections or partitions, allowing for better organization and management of data, with each partition appearing as a separate unit to the operating system and user.
Running a hard disk partition allows you to allocate storage space for different purposes, creating logical divisions that help organize and manage your data more efficiently, improving data organization, system performance, and flexibility in managing digital content.
We will continue to introduce more ways to repartition a hard drive. If you found this guide helpful, please click the social buttons and share it with others who may need it.
How to Repartition a Hard Drive
Now that we have a solid understanding of repartitioning and its benefits, it's time to dive into the practical aspects. This section will provide you with comprehensive methods to repartition a hard drive, including the top three ways to do so.
| Comparison | |||
| 📖Features |
Create/delete/shrink/extend/merge partition |
create/shrink/delete partition | create/shrink/delete partition |
| 🧑💻Difficulty | Simple | Medium | Hard |
| 🧑🤝🧑Suitable Users | For beginners | For experienced | For expertise |
Qiling Disk Master has more features and is suitable for more people. For those unfamiliar with computers or command prompts, a third-party tool like Qiling Disk Master is a nice choice, offering more functionality and ease of use.
Repartition Hard Drives via Third- Party Tool
Repartioning a hard drive can be accomplished using various third-party software tools, such as Qiling Disk Master, which is a powerful and user-friendly partition management software that provides comprehensive features to assist in easily repartitioning your hard drive, including creating, extending, deleting, and resizing partitions.
Repartitioning your hard drives becomes a simple task with Qiling Disk Master. With this tool, you can easily repartition a hard drive within minutes, making it a convenient solution for managing your storage space.
Extend Partition:
Option 1. Extend System C drive with unallocated space
- 1. Right-click on the System C: drive and select "Resize/Move".
- 2. To expand the C: drive, drag the system partition end into the unallocated space to add it to the C: drive.
- 3. Click "Proceed" to execute the operations and extend the C drive.
Option 2. Extend System C drive without unallocated space
- 1. Right-click a big partition with enough free space on the system disk, select "Allocate Space" to allocate the free space to the system disk.
- 2. Select the system drive at the "Allocate Space From" (*) To section, and drag the end of System C drive into the unallocated space.
- 3. To save the changes and extend the C drive, click "Proceed".
Resize Partition:
Step 1: Locate and select the target drive/partition
Launch Qiling Disk Master and go to Partition Manager, select the target drive/partition, right-click on it and choose "Resize/Move" to adjust its size.

Step 2: Resize or move the partition
1. To shrink the partition, simply drag one of its ends to free up unallocated space.
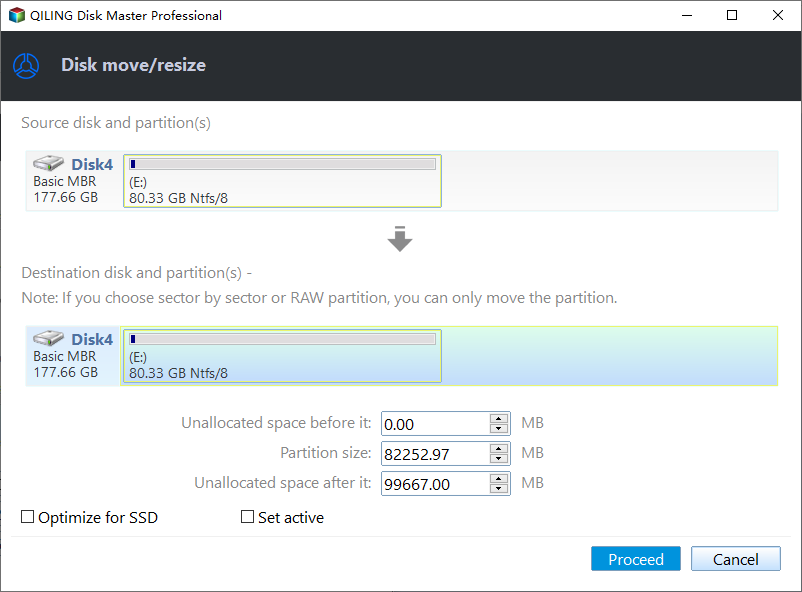
2. To extend the partition, ensure there is unallocated space available. If there isn't, create some by following previous steps. Then, drag your mouse into the unallocated space.
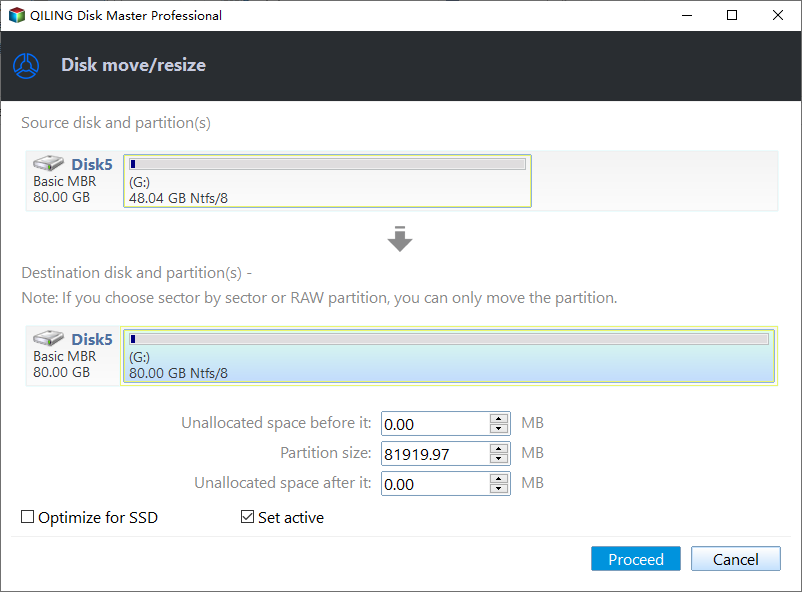
3. To move a partition position, you need to have unallocated space next to the target partition. If not, you'll need to free up some unallocated space first.
Right-To resize/move a partition, click on the target partition, select "Resize/Move" from the context menu, and then drag the whole partition left or right to adjust its position.
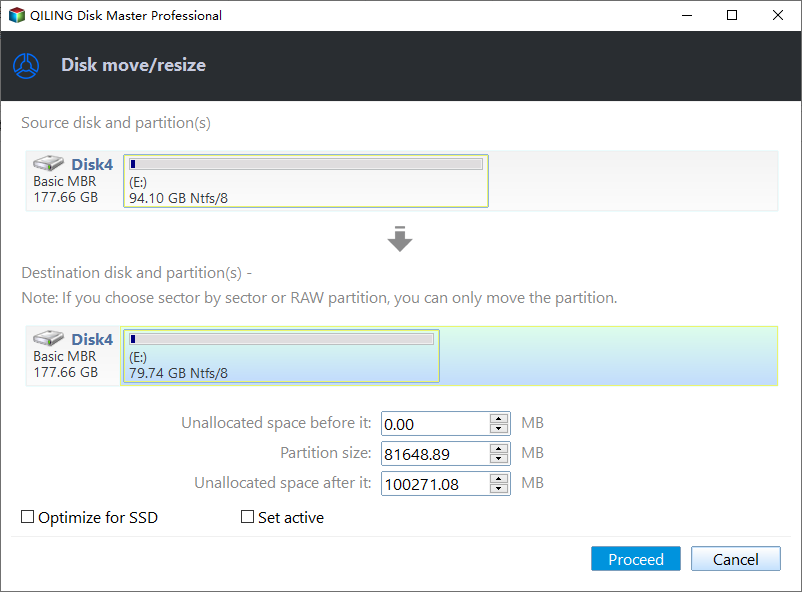
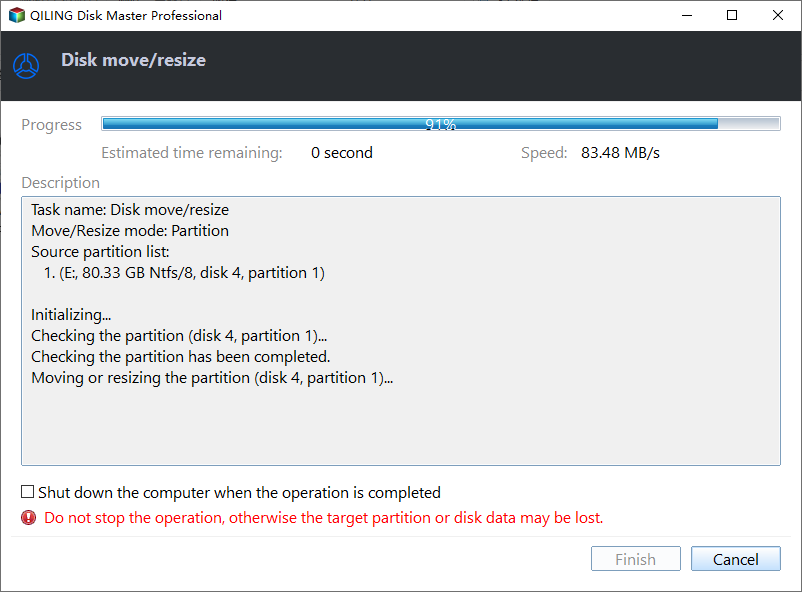
Step 3: Confirm the result and apply changes
The system will display the updated disk partition information and diagram, showing the newly created partition. This is a visual representation of the disk layout, highlighting the changes made to the disk structure.
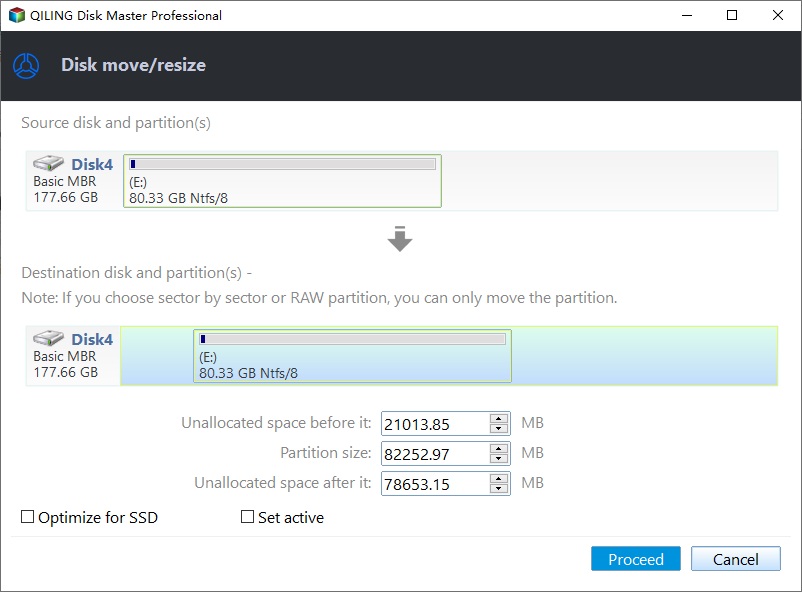
Click the "Proceed" button to save changes.
For more information about managing hard drive partitions:
Repartition Hard Drives via Disk Management
You can use Windows's built-To repartition a hard drive using Disk Management in Windows, follow these steps: Open Disk Management, select the hard drive you want to repartition, right-click on it, and choose "Shrink Volume" or "Extend Volume" depending on your needs. Then, create a new partition by selecting the unallocated space, right-clicking on it, and choosing "New Simple Volume". Assign a drive letter and file system to the new partition, and finally, format the partition to complete the repartitioning process.
Step 1: To access Disk Management, press the "Win + X" key and choose "Disk Management" from the Power User menu, then select the hard drive you want to repartition from the list.
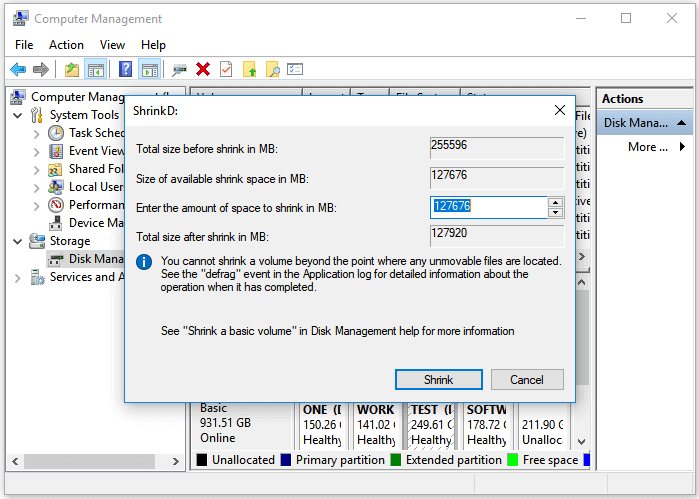
Step 2: To create unallocated space for a new partition, you'll need to shrink an existing partition by right-clicking on the target partition and choosing "Shrink Volume", then entering the desired size, which cannot exceed half of the original volume.
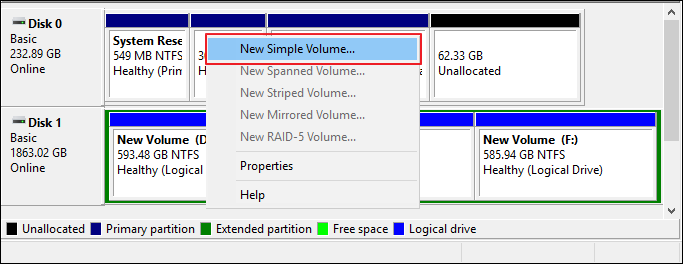
Step 3: After shrinking the partition, you will have unallocated space. To utilize this space, right-click on it and select "New Simple Volume" from the context menu.
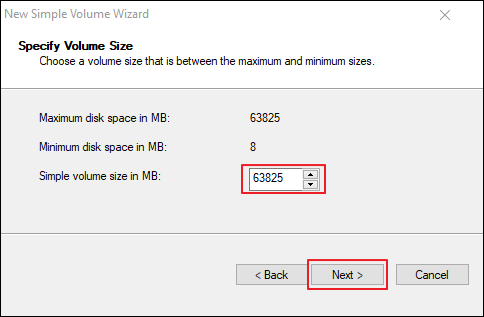
Step 4: The New Simple Volume Wizard will guide you through the process of creating a new partition. You will be prompted to specify the size of the new partition, assign a drive letter or mount point, and format the partition with a desired file system, such as NTFS.
If the "New Simple Volume" option is greyed out, it may be due to the Master Boot Record (MBR) limitation or other reasons. In such cases, you can use Qiling Disk Master to resolve the issue.
Repartition Hard Drives via CMD
Command Prompt or CMD is another way to repartition a hard drive, offering a command-line approach that requires some technical know-how but provides greater control and flexibility for advanced users.
Repartitioning a hard drive using CMD requires administrator privileges and specific commands. Follow the simplified steps below to repartition a hard drive.
Step 1: To open Command Prompt as an administrator and run the Diskpart utility, search for Command Prompt in the Windows search bar, right-click on it, and select "Run as administrator". Then, type "diskpart" and press Enter in the Command Prompt interface. This will launch the Diskpart utility.
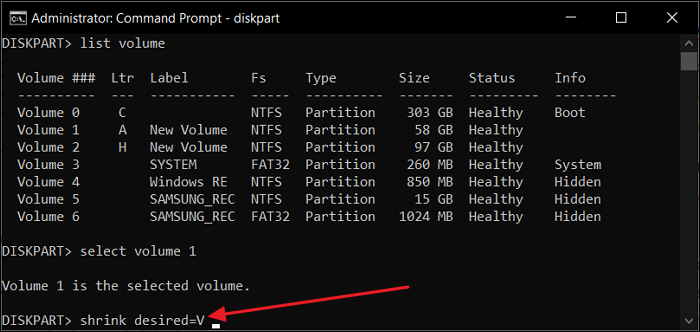
Step 2: To get a detailed list of all the volumes available on your system and choose the specific volume you want to shrink, run the "list volume" command followed by the "select volume X" command, where X is the number of the volume you want to shrink.
Step 3: To shrink a volume, first use the command "shrink desired = V" followed by "create volume simple size = V" to create a new volume on your hard disk, where V represents the desired volume size.
CMD (Command Prompt) is a text-based interface that allows users to interact with their computer's operating system. It provides a wide range of functions for managing files, folders, and drives, as well as executing system commands and scripts.
When Do We Need to Repartition a Hard Drive?
Repartitioning a hard drive can be a helpful solution in various scenarios where the existing partition layout no longer meets your needs. This may include running low on disk space, having multiple operating systems or programs competing for resources, or needing to upgrade to a larger or faster drive. In such cases, repartitioning can help optimize the use of your hard drive, improve system performance, and provide more flexibility for future upgrades or changes.
- Performance Optimization: Creating separate partitions for the operating system and frequently accessed files can improve SSD read/write speeds and reduce disk fragmentation. This can be achieved by repartitioning the drive, ensuring system-related tasks like virtual memory or temporary file storage have dedicated partitions for efficient operation.
- Insufficient Storage Space: You can allocate more space to specific drives by resizing existing partitions or creating new ones, where you can use the extra space as needed.
- Converting Disk Type: Dynamic disks require repartitioning to create spanned or mirrored volumes, but repartitioning is also necessary to remove the dynamic disk configuration and convert a dynamic disk back to a basic disk.
- Resolving Partition-related Issues: Repartitioning can resolve issues like partition corruption, file system errors, or incompatible partition formats by reorganizing the partition layout.
Conclusion
Learning to partition a hard drive is a valuable technique that allows you to optimize storage space, organize data, and enhance system performance. This can be achieved through various methods, such as using Disk Management and the Command Prompt (CMD), but Qiling Disk Master stands out as the best choice for repartitioning your hard drive due to its ease of use, versatility, and advanced features.
Qiling Disk Master offers a user-friendly interface that simplifies the repartitioning process, making it accessible to both non-technical and experienced users. It provides key features such as extending system partitions, merging partitions, wiping partitions, and checking file system errors, offering comprehensive partition management capabilities.
FAQs About How to Repartition a Hard Drive
When performing operations like repartitioning on your hard drive, it's natural to have questions and concerns. Here are some frequently asked questions and their answers: How to repartition a hard drive, and other related queries, will be addressed in this section. The process of repartitioning involves resizing or reorganizing the partitions on your hard drive, which can be a bit complex, but with the right guidance, it can be done safely and effectively.
1. Can I repartition the hard drive without losing data?
You can repartition a hard drive without losing your data by using a reliable tool like Qiling Disk Master, which can safely repartition your computer's hard drives without data loss, and is available for free download and use.
2. How to un-partition the hard drive?
To un-Here are the steps to un-partition a hard drive in one paragraph:
Step 1: To un-partition a drive, open Disk Management, locate the drive you want to modify, right-click on each partition on the drive, and select "Delete Volume".
Step 2: To delete all partitions on a drive and create a new simple volume, right-click on the drive, select "Delete Partition" or "Delete All Partitions" when prompted, confirm the deletion, and repeat this process for all partitions. Once all partitions are deleted, right-click on the unallocated space and select "New Simple Volume."
3. How to partition a 1TB hard drive?
To partition a 1TB hard drive, you'll need to use a partitioning tool like the built-in Disk Management tool in Windows or a third-party software like Qiling Partition Master. You can then create up to 4 primary partitions, or use extended partitions to create more. The recommended partitioning scheme for a 1TB drive is to have a 100-200GB system partition, a 100-200GB data partition, and a 700-800GB partition for storage.
Step 1: To create a new partition on the 1TB drive using Disk Management, select the drive, right-click on the existing partition, choose "Shrink Volume," and specify the desired size for the new partition.
Step 2: To create a new partition, right-click the target space and select "New Simple Volume." Then, follow the prompts to specify the desired size, assign a drive letter, and format the new partition, making it ready for use.
Related Articles
- Windows 11/10 Search Not Working 2024? Fix It Now!
- Fixed: The System Cannot Find Any Bootable Devices| 7 Ways
- How to Move Windows 11 to Another Drive | Ultimate Guide🔥
- Formatting Stuck in Disk Management? Try Qiling Partition Format!
- Qiling Partition Master Full Version Free Download with Serial Code/Key
Qiling Partition Master got promoted into a new version 11.5/15.0 and it's available for you with newly added features now. You can free download Qiling Partition Master full version with serial code or key to managing partitions with ease now. - 2022 Official Access: Get Newest Qiling Partition Master (6.0) Keygen
If you're looking for the latest Qiling Partition Master keygen to crack the software for its full disk management features, this page provides official access to get an authorized license key generated by the Qiling Partition Master keygen. You can follow the instructions to get the newest Qiling Partition Master 10.6 keygen and activate the software for its full disk management features.