How to Repair Windows 10 From USB [Complete Guide]
Discover how to repair Windows 10 from a USB device and regain control over your computer's performance. Our expert guidance provides detailed instructions, tips, and insights on resolving errors, crashes, and software glitches, helping you tackle common system problems for a smoother Windows 10 experience.
View the Necessary Information to Repair Windows 10 from USB:
| ⏱️Duration | 5-10minutes |
| 🎈Preparations |
✔️Prepare a USB drive and format it as FAT32 ✔️Download ISO file and burn it to USB ✔️Windows Installation tool - Qiling Disk Master |
| 👣Steps |
1️⃣Create the Windows 10 Bootable USB |
| 🧑💻Suitable Users | Easy steps, and it's suitable for all users |
Can I Repair Windows 10 from USB?
To repair Windows 10 from a USB drive, you can utilize various Windows boot repair tools such as Command Prompt, System Restore, and Startup Repair. However, if your computer is unable to boot, you won't be able to access these tools. In this case, creating a Windows 10/11 installation USB media allows you to repair Windows from the USB drive.
If your Windows 10 system crashes or fails to boot, creating a Windows 10 repair boot USB can help you troubleshoot and fix the issue. By preparing a bootable drive in advance, you can resolve various problems impacting your operating system's functionality. Preparing a repair boot USB can save you from potential annoyances in the future, and if you find this guide helpful, you can share it with others.
How to Repair Windows 10 From USB?
Repairing Windows 10 using a USB drive is a comprehensive process that involves three main steps. To start, create a Windows 10 repair boot USB drive, which is essential for repairing the operating system. Next, boot your computer from the USB drive and follow the on-screen instructions to select the repair option. Finally, the repair process will guide you through the necessary steps to fix any issues with your Windows 10 installation, ensuring a smooth and successful repair.
1️⃣Create the Windows 10 Installation USB
2️⃣Boot Windows 10 PC from the Installation USB
3️⃣Choose the Suitable Tool to Repair Windows 10 From USB
To repair Windows 10 from a USB drive, follow these steps: Insert the USB drive into your computer, then boot from it by pressing the corresponding key (such as F2, F12, or Del) while powering on your computer. Next, select the USB drive as the boot device from the BIOS settings.
Guide 1. Create the Windows 10 Bootable USB
To create a Windows 10 bootable USB using Qiling Disk Master, first download the Windows 10 ISO file from Microsoft's official website. Then, launch Qiling Disk Master, select the USB drive as the target device, and choose the Windows 10 ISO file to burn. The tool will guide you through the process, ensuring a successful creation of the bootable USB drive. This USB drive can then be used to repair Windows 10 by booting from it and accessing the installation files.
1. To prepare a USB drive with at least 8 GB of space, format the USB to FAT32. This involves erasing any existing data on the drive and reorganizing the file system to the FAT32 format, which is a type of file system that is compatible with a wide range of operating systems and devices.
- Right-To access Disk Management, click on the Windows icon in the taskbar and select "Disk Management."
- Right-click on the target USB and click "Format."
- Follow the on-screen instructions to format the USB.
2. Go to the Windows 10 software download page and download the Windows ISO file.
- Open the download link: https://www.microsoft.com/en-ca/software-download/windows10
- Under Create Windows 10 installation media, choose Download tool now.
3. Burn Windows 10 ISO to USB using Qiling Disk Master
After downloading the Windows ISO file, you need to burn it onto a USB drive using a professional tool. Qiling Disk Master offers a "Burn ISO" feature designed for creating Windows installation disks, making it easy to operate even for newcomers with its simple pages.
Step 1. Launch Qiling Disk Master and go to the Bootable Media section. Click "Burn ISO" and click "Next".

Step 2. To install the operating system from a downloaded ISO image, select the ISO file on your PC and click "Open" to proceed with the installation process.

Step 3. To initiate the burning process, click "Next" and select the target USB as the destination. Then, click "Burn" to execute the operation.
Qiling Disk Master is also a great option for burning ISO files, making it one of the best free ISO burners available. It can be used in various situations, such as creating a bootable USB drive, cloning a hard drive, or backing up data.
Guide 2. Boot from the Installation USB
To start the installation process, you need to create a bootable installation media on a USB drive by following the previous guide, which will be read by your computer to boot up. After creating the bootable USB, you must also change the BIOS boot drive to prioritize the USB drive in the boot order list, allowing your computer to load the installation media instead of the existing system.
1. Change the Boot Order
To change the boot drive in BIOS before booting from the installation USB, follow these steps: First, restart your computer and enter the BIOS settings by pressing the designated key (usually F2, F12, or Del). Then, navigate to the Boot tab and select the new boot drive from the list of available drives.
Step 1. To access the BIOS Setup, power on your computer and immediately press one of the following keys: ESC, F1, F2, F8, or F10, depending on your computer's manufacturer, during the startup process. This will take you to the BIOS settings, where you can make changes to your computer's configuration.
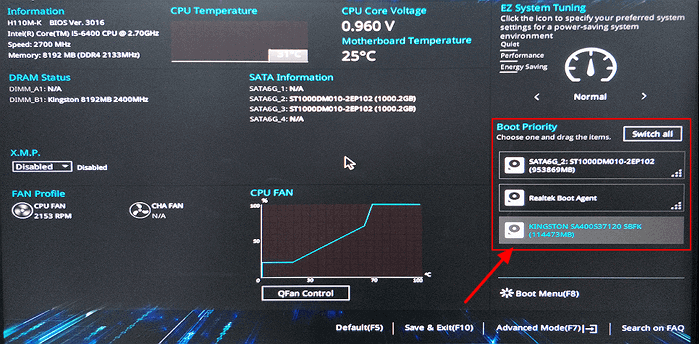
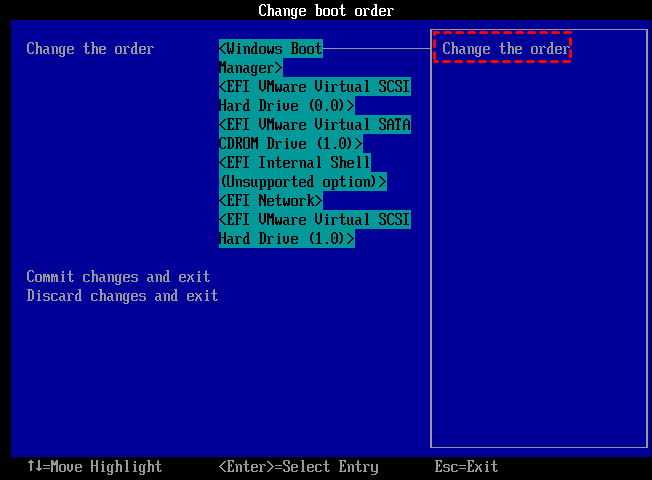
Step 2. Navigate to the BOOT tab using the arrow keys in the BIOS Setup, and select the desired boot order.
Step 3. To make the USB drive the first boot device, you'll need to adjust the boot priority in your computer's BIOS settings. This process varies slightly depending on your computer model and BIOS version, but the general steps are below: Enter your computer's BIOS settings by pressing a key such as F2, F12, or Del during startup. Look for the Boot Order or Boot Priority section and select the USB drive as the first boot device.
Step 4. Save the changes and exit the BIOS Setup.
Step 5. The computer will restart with the updated settings after being booted from the USB drive.
Step 6. Press any key to boot from the external device.
Changing the boot order is crucial when you want to boot from external hard drives, allowing you to access and utilize them as primary boot devices.
2. Boot from the Installation USB
To change the boot drive in the BIOS and boot from the installation USB, follow these steps. First, locate the boot order in the BIOS settings and change it to boot from the USB drive. Then, save the changes and exit the BIOS settings.
Follow the steps to boot from the installation USB:
Step 1. Connect your bootable USB to your PC/Laptop, power it on, and press a key to initiate the USB booting process if prompted.
Step 2. To begin, select your preferred language, timezone, and currency, and then choose your keyboard settings to ensure a smooth and personalized experience. Once you've made these selections, click "Next" to proceed.
Step 3. To resolve the issue, click on the "repair your computer" option in the lower left corner of the screen, then navigate to the "Troubleshoot" section.
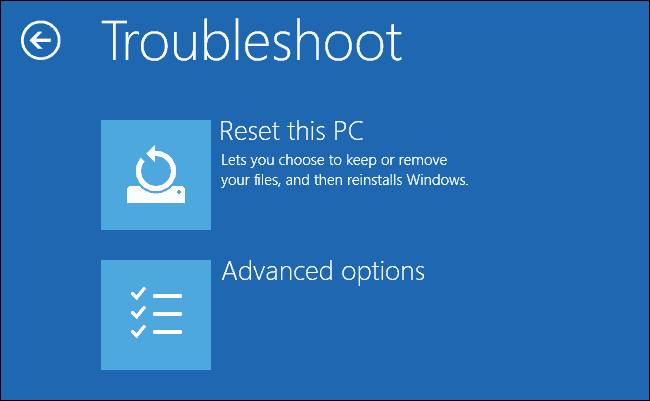
After taking the initial steps, you will be directed to the advanced options screen where you can access various tools to help repair Windows 10.
Guide 3. Choose the Suitable Tool to Repair Windows 10 From USB
Here are the steps to repair Windows 10 from a USB drive:
Step 1: Choose the Suitable Tool to Repair Windows 10.
Windows 10 provides several tools that can help repair your system, such as the built-in System Restore feature, which can revert your system to a previous point in time, and the System File Checker tool, which can scan and replace corrupted system files. Additionally, the System Update Readiness Tool can help fix issues with Windows updates, and the DISM (Deployment Image Servicing and Management) tool can be used to repair corrupted system images. These tools can help resolve various system issues, including boot problems, file corruption, and update failures.
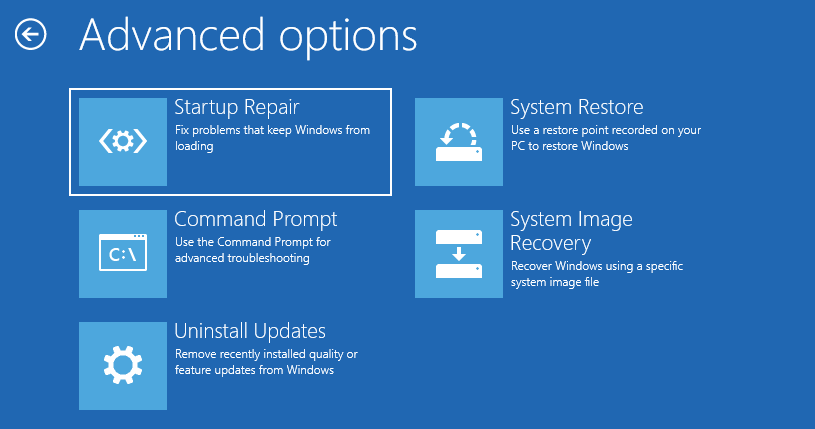
1. Startup Repair: This tool is designed to fix Windows startup problems by scanning for and repairing missing or corrupted system files.
2. Command Prompt: The Command Prompt allows you to execute commands to troubleshoot and fix various problems manually. It provides a command-line interface to run specific commands to repair your system, allowing you to use the appropriate command to perform the repair operation.
- To check the volume file system for errors, use the CHKDSK command. This command checks the file system and physical disk for errors and displays a report of any errors found.
- Use BCDBoot to repair a corrupted boot file system.
To resolve the issue, you can try running the built-in Windows tool, System File Checker (SFC), which scans and repairs corrupted system files. You can also use the Deployment Image Servicing and Management (DISM) tool to repair corrupted system files and registry entries. Additionally, you can use the Windows Update Troubleshooter to resolve any issues with Windows updates.
3. Uninstall Updates: This feature is used to uninstall the most recent Windows update to troubleshoot issues after a quality update or feature update installation. It may resolve problems if the issue is related to the latest update.
4. System Restore: This tool allows you to restore your computer to a previous working state by reverting system files, registry, and settings to a previously created system restore point.
5. System Image Recovery: This feature is a copy of the drive that Windows needs to run, allowing you to recover your computer if your hard drive or device stops working.
If you want to know more about repair tools on Windows 11, click the link below:
Step 2: Choose the appropriate tool based on your specific needs.
If your computer is having trouble starting up, you can try using the Startup Repair tool. If you need more control over the repair process, you can use the Command Prompt. If you think a recent software or driver installation is causing the issue, you can try System Restore to roll back to a previous point when everything was working properly.
Note: The tools available for repair may vary depending on the Windows 10 version and any specific recovery or repair options installed on the USB, but generally, users should follow each tool's on-screen instructions to initiate the repair process effectively.

How to Boot Windows 10 from USB Flash Drive
To install Windows or run it on different devices, you can create a bootable USB drive to boot Windows 10 from a USB flash drive, following this guide.
Conclusion
This guide provides a step-by-step tutorial on how to repair Windows 10 using a USB drive. It highlights the importance of having a Windows 10 repair boot USB and offers instructions on how to create one. Additionally, it explains the process of booting from the USB and selecting the appropriate tool to repair Windows 10.
The best solution to repair your Windows 10 system depends on the specific issue you're facing. For startup-related problems, Startup Repair is a useful tool. If you need more manual control for troubleshooting, Command Prompt is the way to go. Alternatively, System Restore can be effective for reverting to a previous working state.
FAQs About Repair Windows 10 From USB
If you have further questions about repairing Windows 10 from a USB drive, we have a list of frequently asked questions (FAQs) that provide more information. These FAQs answer common queries, offering additional details on this process.
1. How to repair Windows 10 from the command prompt?
To repair Windows 10/11 from the command prompt, you can use the SFC (System File Checker) command-line utility to troubleshoot and fix issues manually. SFC scans for and repairs corrupted or missing system files, helping to resolve startup problems and other computer issues. To use SFC, follow these steps:
Step 1. Open the Command Prompt as an administrator.
Step 2. Type "sfc /scannow" and press Enter.
If System File Checker (SFC) fails to resolve the issue, it's possible that the Windows image itself is corrupted, leading to the failure of SFC to fix the problem. In this scenario, you might need to consider alternative solutions.
2. How to repair install Windows 10 with ISO file?
To repair install Windows 10 using an ISO file, you can follow these steps: create a bootable USB drive or CD/DVD from the ISO file, boot from the media, and then follow the installation process to reinstall Windows 10 while keeping your files, settings, and applications intact. This process will not affect your personal files, but it may remove any installed applications or drivers that were not included in the original installation.
Step 1. Create a bootable USB or DVD from the Windows 10 ISO file.
Step 2. Boot your computer from the USB or DVD.
Step 3. Select "Install Now" and choose the "Upgrade" option.
Step 4. Track the on-screen instructions to finish the installation.
3. Why unable to repair Windows 10 from USB?
You might be unable to repair Windows 10 from a USB drive for several reasons, including an incorrect boot order, a faulty USB drive, a corrupted installation media, or issues with the Windows Recovery Environment. Additionally, you may not have the necessary permissions or privileges to perform the repair, or the USB drive may not be formatted correctly for the repair process. Furthermore, the Windows installation media may be outdated or not compatible with your version of Windows 10, which can also prevent the repair from being successful.
- The USB drive is not properly created or formatted as a bootable device. This is likely due to a variety of reasons, such as incorrect settings during the formatting process, a faulty USB drive, or an issue with the operating system.
- The USB drive is not recognized or detected by your computer during the boot process, which may be due to a faulty USB drive or incorrect boot settings. To troubleshoot, try using a different USB port, checking the boot order in the BIOS settings, or using a different USB drive.
- The Windows 10 installation files on the USB drive are corrupt or incomplete, which is preventing the installation process from proceeding. This issue can be resolved by re-downloading the installation files from the Microsoft website and re-creating the USB drive.
- The computer's BIOS settings need to be adjusted to prioritize the USB device as the primary boot source, allowing the system to recognize and load the operating system from the USB drive. This typically involves entering the BIOS settings during startup, navigating to the boot order menu, and selecting the USB device as the first boot option.
Related Articles
- Move Unallocated Space on Windows Server[Full Steps]
- Top 5 SD Card Formatter Free Download | Format SD Card on Windows 11/10/8/7
- [Fixed] Seagate External Hard Drive Slow on Windows 11/10
- How Often Should PC Be Cleaned?
Most PC users know that cleaning their PC is important, but only a few of them know how often should PC be cleaned. So in this post, we will provide you the answer and 2 easy ways to clean your PC. - How to Manage SSD Partition Alignment Well?
Partition alignment helps you optimize the performance of SSD. Learn how to do SSD partition alignment in Windows by using Qiling Disk Master. - SSD Trim: Knowledge of SSD You Cannot Miss
What is SSD trim, and how do you enable SSD trim support in Windows 10/8/7? Find the answers in this tutorial and learn how to use trim software for SSD drives.