How to Install Windows 10 on M.2 SSD? 2024 Full Guide
Key Takeaways:
- Installing Windows 10 or Windows 11 on an M.2 SSD can significantly improve the overall performance of your Windows system, including faster loading times and smoother operation.
- You can install Windows 10 by either burning the Windows 10 ISO to an M.2 SSD or migrating the operating system.
- If you're experiencing issues installing Windows 10/11 on an M.2 drive, we can help. Our troubleshooting guide provides a quick fix to resolve the problem.
M.2 SSD is a solid-The M.2 interface is a small form-factor drive that can replace the mSATA interface. It is small and has the same dimensions as a USB memory stick. With faster read speeds and greater capacity, it is widely used.
Upgrading your computer's storage drive to an M.2 NVMe SSD is a good choice, and there are two professional ways to install Windows 10 on M.2 SSD and boot from the new M.2 SSD, as introduced by Qiling Software.
View the Necessary Information to Install Windows 10 on M.2 SSD:
| ⏱️Duration | 5-8 minutes reading |
| 💻Supported OS | Windows 11. Windows 10 and Windows 7/8 |
| 🧰Tools | To upgrade or migrate your Windows 11 installation, you may need to use an OS migration software, such as a disk cloning tool, to transfer your files and settings to a new SSD or hard drive. This process typically involves creating a Windows 11 ISO file, which can be used to install the OS on the new drive. |
| ✍️Solutions |
How to Install Windows 10 on M.2 SSD
Installing Windows 10 on an M.2 SSD is a straightforward process. Before starting, ensure your computer recognizes the required drive by confirming or configuring the necessary settings.
- Your computer needs to support the M.2 standard and meet Windows 11 minimum system requirements.
- The NTFS file system formats the drive, making it recognizable when connected to the computer.
- If it's a brand new M.2 drive, initialize it to GPT, otherwise, you'll encounter the issue of Windows 10 not installing on the SSD.
- Remove the old drive, connect the M.2 SSD to the PC, and ensure it can be detected.
To install an M.2 SSD on Windows 10, there are two methods. One method involves physically installing the M.
1️⃣Method 1. Migrate Windows 10 OS to M.2 SSD
2️⃣Method 2. Burn ISO to M.2 SSD and Install Windows
Here's a summary of the two methods to install Windows 10 in one paragraph:
Read Also: Install Windows 10 on New PC Without Operating System
Method 1. Migrate Windows 10 OS to M.2 SSD
Migrating Windows OS with Qiling Disk Master provides a simpler and more convenient way, allowing you to transfer the operating system, programs, and data to another disk with fewer steps and less time.
This program offers a quick and secure way to migrate a system or clone a partition, making it a reliable solution for various system management tasks.
Steps to migrate OS to HDD/SSD:
- Run Qiling Disk Master, and select "Clone" from the tools tab.
- Check "System Clone" and click "Next".
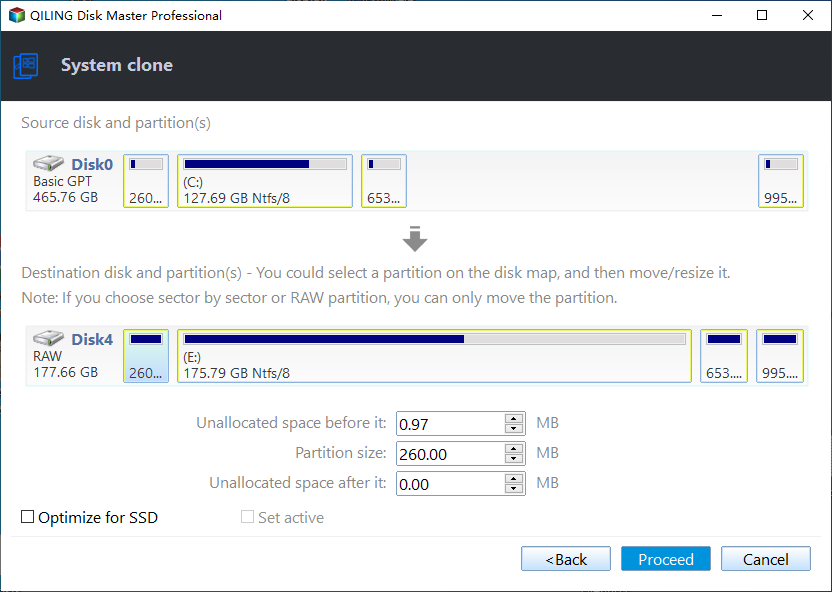
- Select the SSD or HDD as the destination disk and click "Next".
- To migrate your operating system to a new disk, start by previewing the layout of your target disk. Once you're satisfied with the layout, click "Proceed" to initiate the migration process. This will start the process of transferring your OS to the new disk, allowing you to boot from the new disk once complete.
- The data and partitions on the target disk will be completely erased, so ensure that you have backed up any important data beforehand. If you haven't done so, please do it now to avoid any potential loss.
- Then click "Yes".
- After installing the new disk, click "Reboot Now" or "Done" to see if you want to reboot the computer from the new disk right away.
"Reboot Now" means to keep the changes instantly, while "Done" means you need to restart the computer later manually.
Note: When migrating your operating system to a new SSD or HDD, be aware that it will erase all data and partitions on the target disk if there's not enough unallocated space available. Make sure to back up any important data on the target disk to an external drive beforehand to avoid losing it.
After cloning, Qiling Disk Master will prompt you to set the M.2 drive as a boot disk, or you can set it later in the BIOS.
The "Clone" feature of Qiling Disk Master is not only suitable for cloning a hard drive to a larger one, but also useful in other situations. For example, if you want to create a backup of your system drive, you can clone your system drive to an external hard drive using the "Clone" feature.
Method 2. Burn ISO to M.2 SSD and Install Windows
You can install Windows 10 on an M.2 SSD by burning the Windows ISO file to a USB drive, or by using the Windows Media Creation Tool or third-party software. Alternatively, you can also install Windows 10 by downloading the Windows ISO file and using it to install the operating system.
- Notice:
- To create Windows installation media, you'll need a USB drive with at least 8GB of free space, and you'll need to download the correct Windows ISO file.
To improve the success rate of installing Windows, it is recommended to burn the Windows installation file onto a USB using the Burn ISO function in Qiling Disk Master, and then use the resulting USB to install the system on Windows.
Stage 1. Burn ISO to USB and Create Installation Media
Burning an ISO to a USB drive can be helpful for migrating an operating system or reinstalling the system. With a professional and free ISO burner, you can easily burn an ISO to a USB drive. This process allows for the installation or reinstallation of the system, making it a useful tool for various computer needs.
Step 1. Launch Qiling Disk Master and go to the "Tools and utilities" section. From there, click on "Create Bootable Media".

Step 2. Click "Next" and select the target USB as destination.
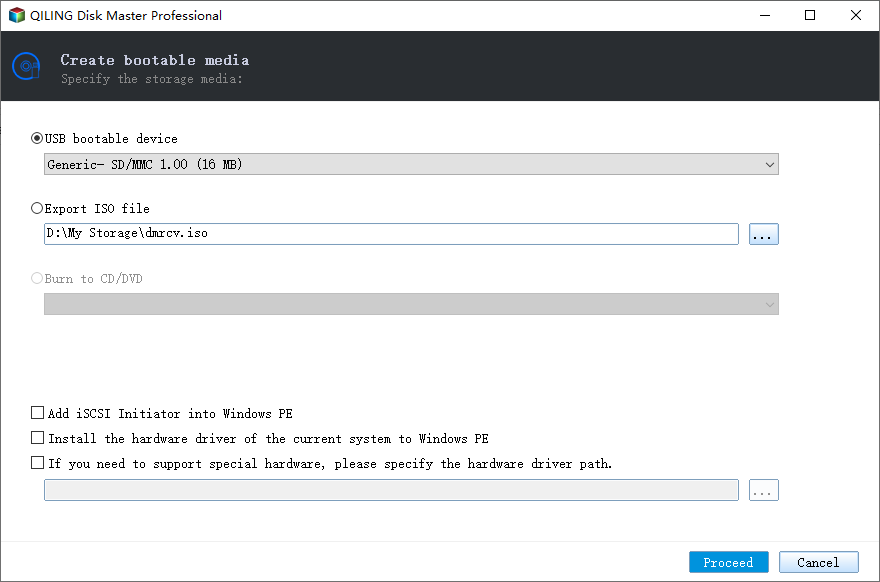
Step 3. Click "Proceed" to execute the operation.
Qiling Disk Master's "Burn ISO" feature is useful in various situations. When you need to create a bootable USB drive from an ISO file, this feature comes in handy.
Stage 2. Install Windows 10 on M.2 SSD Successfully
After burning Windows 10 ISO, please plug the bootable USB into the computer that requires an M.2 SSD. Then check the following steps to install the system:
Step 1. To change the BIOS boot order, you'll need to enter the BIOS settings. This is usually done by pressing a key like F2, F12, or Del as soon as the computer starts.
Step 2. Restart the computer, go to Windows Setup, choose the language and other options, and click "Install now".
Step 3. Enter or skip the license key.
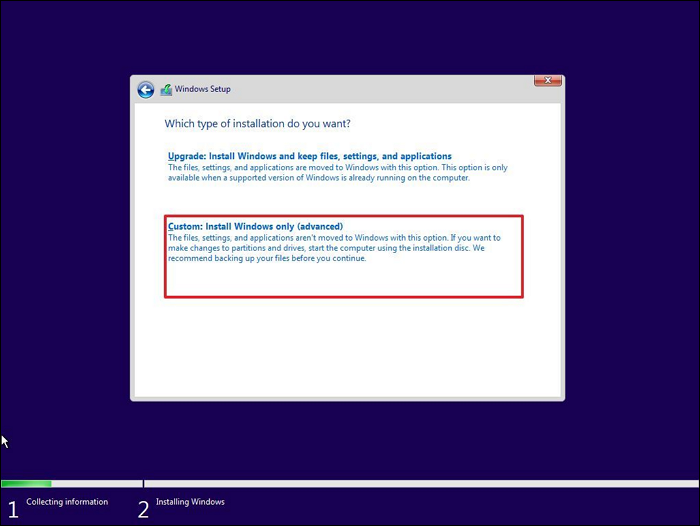
Step 4. Select "Custom: Install Windows only (advanced)" and choose M.2 SSD as the installation location, then the installation process will begin.
Read Also: To install Windows 10 on a second hard drive, first, ensure the drive is recognized by your computer. You can do this by going to the Disk Management tool in Windows.
You can use Windows Creation Media to create a bootable USB and install Windows from it, making the process simpler and more convenient.
Bonus Tip: Fix Can't Install Windows 10 on M.2 SSD
Qiling has provided two effective solutions to help install Windows 10/11 on M.2 SSD, addressing issues where some users were unable to install Windows 10 using the manual method and encountered problems with Windows 10 not installing on SSD.
Don't worry. We have some quick possible causes and solutions for you:
- BIOS misconfiguration: Improper BIOS settings or storage controller mode may prevent Windows 10 installation. Check BIOS settings and ensure the correct M.2 SSD is detected.
- Secure Boot issue: Secure Boot may prevent Windows 10 installation on M.2, as it ensures the OS's integrity. Try disabling Secure Boot to install.
- Hardware incompatibility: Older motherboards or systems may not support firmware updates. To resolve the issue, you can either remove incompatible hardware or update the NVMe driver to the latest version.
- Wrong version of Windows: Downloading the wrong ISO file may result in an inability to burn the ISO to a USB drive. To avoid this, ensure to use the correct tool and download the intended version.
If you're unable to manually install Windows 10 on an M.2 SSD, you can try using Qiling Disk Master to clone your Windows OS to another drive without losing any data.
Installing Windows on your Steam Deck in 2024 is a straightforward process, but it requires some preparation and caution. First, ensure your Steam Deck is running the latest software and that the device's storage is free enough to accommodate the Windows installation. Next, create a bootable Windows USB drive, which can be done using a tool like Rufus.
You'll find a detailed guide on installing Windows OS on the Steam Deck, along with a step-by-step tutorial and troubleshooting alternatives, in the post.
Conclusion
You can successfully install Windows 10/11 on an M.2 SSD using the solution provided in this article, which leverages Qiling Disk Master to provide a quick and effective solution. This tool offers advanced features to help you solve more complex problems and enjoy faster boot-up and better performance.
FAQs About How to Install Windows 10 on M.2 SSD
No, that's all for now. You've covered everything. I think you're done. You can stop here.
1. Why was M.2 SSD not detected in the Windows 10 install?
If your M.2 SSD doesn't show up during installation, it might be a BIOS setup error or the SSD's format is incompatible. Check the BIOS settings to ensure the M.2 SSD is enabled and its boot sequence is correct. Alternatively, try reformatting the disk using Diskpart or Qiling Disk Master.
2. How to install Windows on NVMe SSD on an HP laptop?
To install Windows on an NVMe SSD, you can refer to the article on how to do it, or follow the procedure outlined below.
Stage 1. Initialize the NVMe SSD for use.
Stage 2. To clone Windows OS to the NVMe SSD using Qiling Disk Master, follow these steps: First, download and install Qiling Disk Master on your computer. Then, launch the software and select the source drive (usually C:) and the destination drive (the NVMe SSD).
Stage 3. To set up the NVMe SSD as a boot disk on the new computer, first, connect the SSD to the motherboard using the provided NVMe cable. Ensure the SSD is securely fastened to the computer case to prevent it from moving during use.
3. How to initialize M.2 SSD?
Windows offers several easy methods to initialize SSDs for Windows. Using Disk Management, you can initialize an SSD by following these steps:
Step 1. "Disk Management" can be chosen by right-clicking the Windows icon.
Step 2. Select the disk you want to initialize, then click on the "Initialize Disk" option to proceed with the initialization process.
Related Articles
- How to Migrate OS from HDD to SSD? OS Migration 2023
- Boot Device Not Found in Windows 11? Here Are The Fixes
- What is Seagate Discwizard? How Can I Use It and Its Alternative?
- How to Change BIOS Mode from Legacy to UEFI Windows 10/11
- How to Fix (GPT) Hard Disk Partition Not Recognized in Windows 11/10
If your hard disk partition is not recognized by Windows 11/10, or you're wondering why your hard drive partitions aren't showing up, you can easily solve the issue on your own. - How to Tell If Windows Is GPT or MBR [Your Guide Is Here]
To upgrade or switch the Windows operating system, it's crucial to know the disk partition style of your OS disk or source disk. You can easily check if your hard drive is using GPT (GUID Partition Table) or MBR (Master Boot Record) by following these steps.