How to Uninstall Sonoma Without Losing Data
When considering the removal of macOS Sonoma, the possibility of data loss can be unsettling. Fortunately, with the help of Deep Data Recovery for Mac Pro, you can uninstall Sonoma without losing your data. This powerful program is designed to handle various data loss scenarios, making the recovery process smooth and efficient.
Qiling software is a comprehensive solution for data loss caused by Sonoma uninstalling or other unanticipated events, making it one of the best Sonoma data recovery software available.
Since Apple released the official version of macOS Sonoma, many users have been eager to download and experience its new features and capabilities. Unfortunately, numerous users have reported encountering various issues with Sonoma, including problems that have left them looking for solutions.
- 😓The macOS Sonoma runs slow after the update
- ⛔macOS Sonoma is stuck on the loading screen
- ❎Apps not working on macOS Sonoma
- 😫macOS Sonoma freezing and crashing
- ......
If you've encountered glitches with macOS Sonoma and decided to downgrade to Ventura, the Qiling data recovery tool is available to help recover lost files while you uninstall Sonoma without losing data.
This article provides guidance on data recovery to protect your data during and after the Sonoma removal process, specifically highlighting the importance of Deep Data Recovery for Mac Pro.
Step 1. Backup Your Data
To ensure your data is secure when removing macOS Sonoma, use Time Machine, a built-in backup feature on Mac, to safeguard your information ahead of time.
Step 1. To access Time Machine settings, click on the Apple menu, select "System Preferences", and then choose "Time Machine".
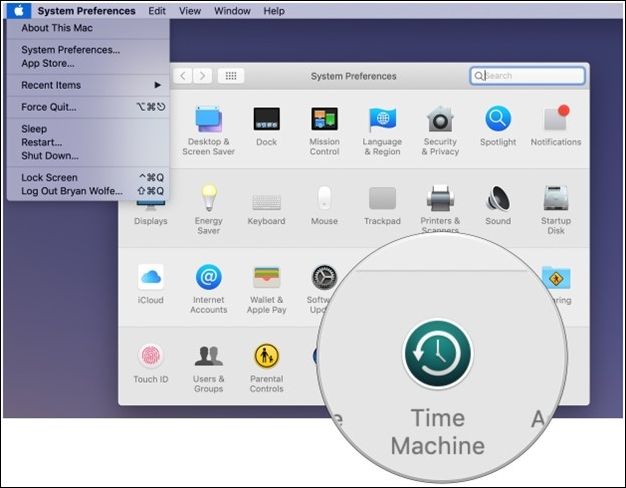
Step 2. To select a backup disk, click on the "Select the Backup Disk" option, then connect an external drive and set up Time Machine to utilize it as your backup disk.
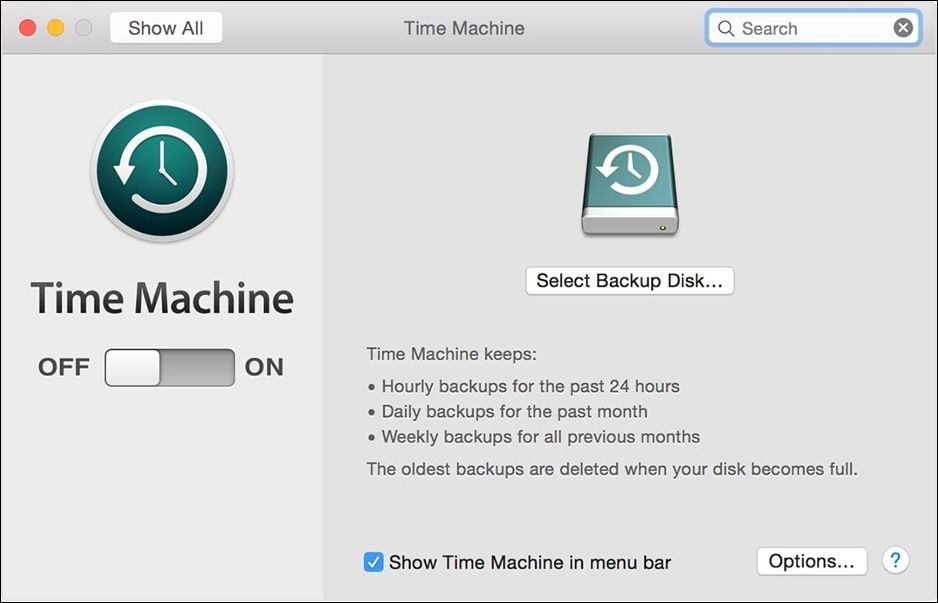
Step 3. To enable automatic backups using Time Machine, click on "Backup Automatically". This will initiate the process of preparing the files for backup, allowing for seamless and automated protection of your data.
Time Machine ensures that your data is regularly backed up by following a simple process, providing a restore point in case of unexpected data loss during the Sonoma uninstallation, allowing you to restore your Mac from Time Machine.
For enhanced data security, consider using the Deep Data Recovery for Mac Pro, which helps recover lost data and provides a seamless backup option. Additionally, utilize the combined powers of Time Machine and Qiling to protect your data completely. This approach ensures that your data is safeguarded against any potential loss or corruption.
Back Up Your Mac and Never Lose Data
To back up and restore your MacBook/iMac without using Time Machine, iCloud, or external hard drives, you can use the built-in Backup feature in the Settings app on your Mac. This feature allows you to create a backup of your Mac's data and settings, which can then be restored in case of a problem.
Step 2. Erase Your Mac Using Disk Utility
Here are the steps to prepare your Mac for a clean slate before removing macOS Sonoma:
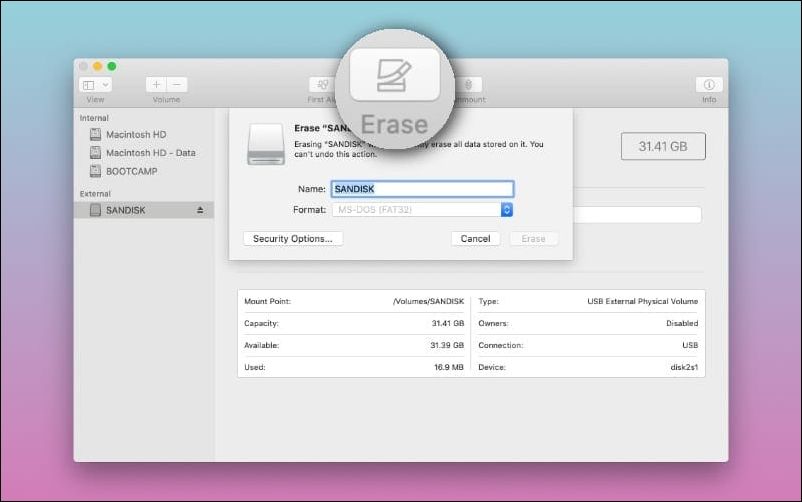
Step 1. To restart your Mac, press and hold the Command + R keys until the Apple logo appears. Then, select Disk Utility from the menu.
Step 2. From the left sidebar, select and click on the main drive of your Mac.
Step 3. To confirm the erasure of the drive, click the "Erase" button. This will permanently remove all data on the drive, and it cannot be recovered.
Follow these steps to prepare your Mac for a smooth Sonoma uninstallation: completely shut down your Mac, unplug all cables, and disconnect any external devices. This ensures a clean environment for the uninstalling procedure, preventing any potential data corruption or loss.
To resolve the "Erase Assistant is not supported on this Mac" error, try restarting your Mac, checking the System Report for any issues, and ensuring the Mac is running the latest version of macOS. If the issue persists, try booting in Safe Mode and then attempting to erase the Mac. If none of these steps resolve the issue, you may need to contact Apple Support for further assistance.
To fix the "Erase Assistant is not supported on this Mac" error, update your Mac's operating system to the latest version by going to System Preferences, then Software Update, and following the prompts. Once updated, you should be able to use the Erase Assistant without issues.
To fix the error "Erase Assistant is not supported on this Mac," you can try running the Disk Utility application in Recovery Mode. This will allow you to erase the startup disk and reinstall macOS. To do this, restart your Mac and immediately hold down the Command (⌘) + R keys.
If you're looking to uninstall macOS Sonoma without losing any data, you can do so by following a few simple steps. First, ensure that all your important files and documents are backed up, either through Time Machine or an external drive.
Step 3. Preparation Before Uninstall macOS Sonoma
Before uninstalling, perform a comprehensive pre-check to ensure a smooth experience. To prepare your Mac, take the following steps.
🌐Internet Connection
Confirm a stable internet connection to ensure a smooth uninstallation process by having the required files and resources readily available.
💾Examine Storage Space
To ensure a smooth uninstallation of macOS Sonoma, check your Mac's storage space to guarantee there's enough room for the process. This prevents pauses or errors caused by insufficient space, allowing for a hassle-free removal of the operating system.
✅Power Supply Connection
Ensure your Mac is plugged into a stable power source to prevent unexpected shutdowns and data loss during the uninstallation process.
These tests help prevent any issues during the uninstallation process by ensuring a stable internet connection, sufficient storage, and a reliable power supply, safeguarding your data and the uninstallation process from unexpected outages.
Step 4. Choose a Fix to Uninstall Sonoma Without Losing Data
To uninstall macOS Sonoma safely, confirm that your data is backed up first. Then, choose one of the four reliable methods we've outlined, each offering a unique approach to removing the operating system without compromising your content.
Fix 1. Uninstall Sonoma Using Factory Reset
If your Mac comes with macOS Sonoma and you want to downgrade to Ventura, a factory reset is a simple method to restore the operating system to its original macOS build, which works for both Intel and Apple CPUs.
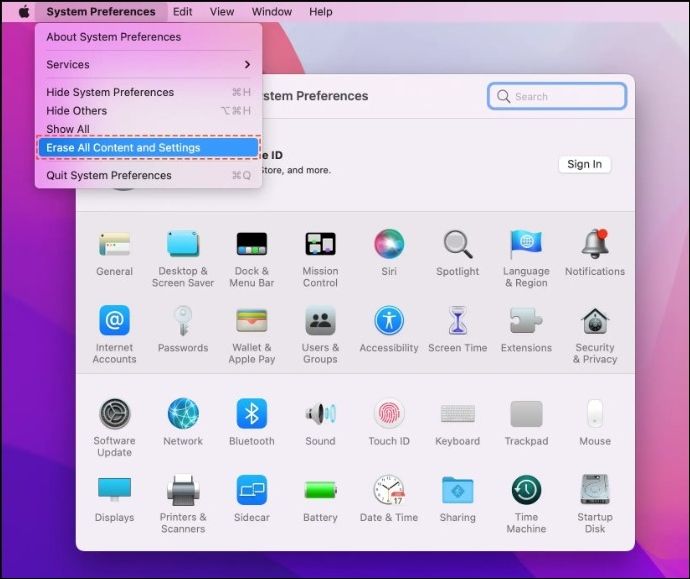
Step 1. To open "System Preferences", click the Apple symbol in the upper left corner of your Mac screen.
Step 2. Select "Erase All Content and Settings" and input your Mac password to confirm.
Step 3. To sign out of your Apple account and start a factory reset, enter your password and click "Continue". After that, select "Erase All Content & Settings" to initiate the process.
Step 4. Wait for the language interface to appear, then continue with the installation of MacOS Monterey.
If you've forgotten your Mac password, don't worry! You can factory reset your Mac without needing the password.
Factory Reset Mac Without Password [for macOS Ventura/Monterey]
If you've forgotten your Mac password or are experiencing issues with your device, you may need to factory reset it. Fortunately, this process is relatively straightforward and can be completed without a password. To begin, turn off your Mac and locate the Command (⌘) + R keys on your keyboard.
Fix 2. Uninstall Sonoma with a Time Machine Backup
If you used Time Machine to back up your Mac before upgrading to Sonoma, uninstalling is a straightforward process. Your Time Machine backup contains the original macOS installation files, making it easy to revert back to the previous version. To uninstall Sonoma, follow the necessary steps.
Step 1. After deleting Macintosh HD in macOS Recovery, you can open "Disk Utility" and then dismiss it to return to the "macOS Utilities" menu.
Step 2. Connect your Mac backup drive and restart your Mac in Recovery Mode.
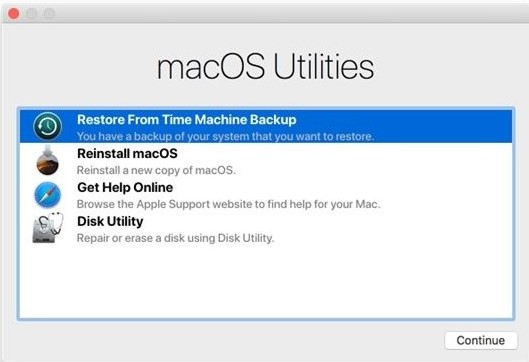
Step 3. On the "macOS Utilities" menu, click "Restore From Time Machine Backup" and then click "Continue".
Step 4. Select your Time Machine backup and click "Continue".
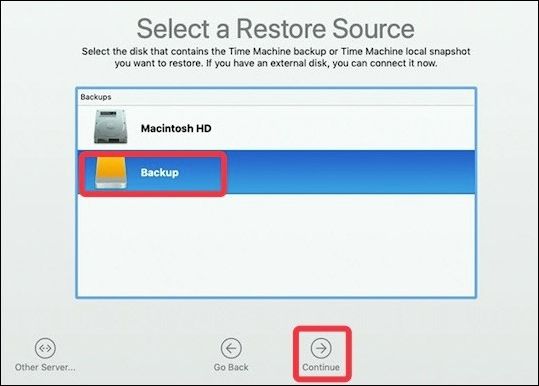
Step 5. Choose the Time Machine backup location, usually your Mac's internal hard disk.
Step 6. To restore the backup with your preferred macOS version and personal data, click "Restore".
| NoteThe repair procedure may take time, and after uninstalling, your Mac will restart with macOS Ventura or the chosen macOS version. |
Fix 3. Uninstall macOS Sonoma via Recovery Mode
To remove Sonoma from your Mac without losing any data, you can use macOS Recovery Mode. This process involves booting your Mac in Recovery Mode, then running a Terminal command to delete the Sonoma installation. To do this, restart your Mac and immediately hold down the power button until the startup options menu appears.
Step 1. To reset your Mac's network settings, start by connecting your Mac to the network. Then, restart your Mac while holding down the "Shift + Option + Command + R" keys.
Step 2. Wait until the globe starts rotating, then let go of the keys to reboot the Mac into Recovery mode.
Step 3. Once the device restarts, select the "Reinstall macOS" option in the macOS Utilities box.
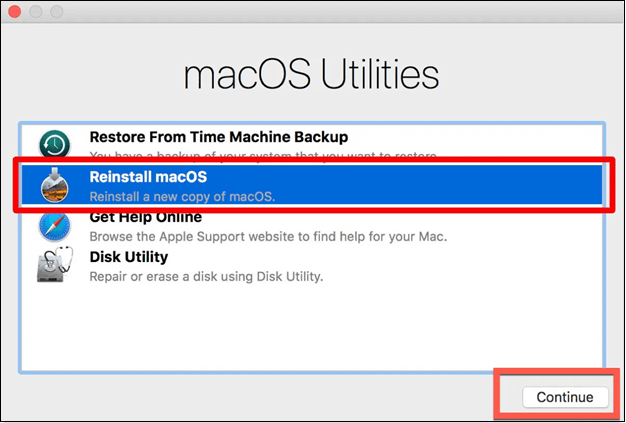
Step 4. Install the macOS version you want by following the instructions.
If you're experiencing the error "The recovery server could not be contacted" on macOS, don't worry - this article will introduce 8 practical methods to fix the issue.
To fix the recovery server could not be contacted on macOS Sonoma/Ventura, try restarting your Mac in Recovery Mode, then select your language and country or region. If this doesn't work, go to System Preferences > Software Update and install any available updates.
The error "The recovery server could not be contacted" can be frustrating, but there are 8 practical methods to resolve it. Firstly, restart your computer and try again, as this can often resolve the issue. If that doesn't work, try checking your internet connection and ensuring it's stable.
Fix 4. Use a Bootable USB Drive to Uninstall Sonoma
To create a macOS Ventura bootable USB and remove Sonoma while protecting your data, follow these steps: you can create a bootable USB for macOS Ventura, which will allow you to boot into the new operating system and remove Sonoma without risking your data. This process involves downloading the macOS Ventura installer, creating a bootable USB drive using the installer, and then booting from the USB drive to install Ventura and remove Sonoma. By doing so, you'll be able to safely transition to the new operating system while preserving your existing data.
Step 1. To update to macOS Sonoma, get the installer from the Mac App Store, which was published on September 26, 2023. At the same time, back up your Mac's files to ensure they are safe.
Step 2. In "Disk Utility", select the USB drive and click "Erase" to format it. You'll need to determine whether to use APFS or Mac OS Extended, as both formats have their own advantages on macOS.
Step 3. Connect the formatted USB to your Mac and launch Terminal in Spotlight. Enter the command: `diskutil list` to view a list of all connected disks, including the formatted USB. Then, enter `diskutil eraseDisk -type MS-DOS HFS+ /dev/diskXs1` (replace `/dev/diskXs1` with the actual device name of the formatted USB) to erase the disk and format it as MS-DOS (FAT32).
To create the installation media for macOS Sonoma, navigate to the Applications folder and find the Install macOS Sonoma app. Then, open Terminal and run the command `sudo /Applications/Install\ macOS\ Sonoma.app/Contents/Resources/createinstallmedia --volume /Volumes/MyVolume` (replace "MyVolume" with the actual name of your USB drive), and press Enter.
Step 4. To boot from a USB on your Mac, insert the bootable USB drive into your computer, then press the Power button while holding the Option (⌥) key for Apple silicon Macs, or the 't' key for older Intel-based Macs. This will allow you to choose the bootable disk from the startup options menu.
Step 5. Clean and install macOS on your Mac using on-screen instructions.
Conclusion
Uninstalling macOS Sonoma requires careful planning to avoid losing important data. The article provides clear instructions and various solutions based on individual preferences, helping users navigate the process with confidence.
Use Deep Data Recovery for Mac Pro to protect your data better. This expert program offers complete data recovery options in various settings, making it a proactive step towards safeguarding your digital data and maintaining peace of mind during activities like removing Sonoma.
Uninstall Sonoma Without Losing Data FAQs
As users navigate the process of uninstalling Sonoma without data loss, common questions may arise. Let's address some of these queries.
1. Can you uninstall Sonoma?
Download the desired macOS version, create a bootable USB installer, start with the USB Installer, erase your Mac's hard drive, reinstall macOS, and then migrate from your Time Machine backup, remembering to back up essential data before uninstalling macOS Sonoma.
2. How do I downgrade Sonoma without losing data?
To downgrade Sonoma without losing data, make a backup using Time Machine or a similar tool before reinstalling the desired version of Sonoma, or use Deep Data Recovery for Mac Pro to recover lost or deleted data after downgrading.
3. How do you erase a Mac Sonoma?
To erase and reinstall macOS Sonoma on your Mac, go to "Applications > Utilities > Disk Utility", select the Mac hard drive, click "Erase", and follow the on-screen instructions. To uninstall Sonoma, go to "macOS Utilities", choose "Reinstall macOS", and select the desired macOS version.
Related Articles
- Windows Update Not Installing - Try These 6 Fixes
- [3 Easy Ways] How to Backup Google Photos to Hard Drive
- Delete OS from A Hard Drive
- Transfer Data from Mac to Mac (Old to New) - 6 Tested Methods
- How Sonoma Game Mode Boosts Your Mac Performance
Are you wondering how sonoma game mode boosts your Mac performance? This article will guide you on how to do so with simple and easy steps! - macOS Sonoma Runs Slow After Update | 8 Ways to Fix
Fix macOS Sonoma running slow after update. Learn how to free space, check startup items, reset settings, and improve performance.