How to Fix Apps Not Working on macOS Sonoma
Upgrading to macOS Sonoma can be a new beginning, but users often experience app unresponsiveness or crashes, hindering a hassle-free experience.
The apps are not working on Sonoma, so take a look at the article to find out why and try the 7 possible fixes listed below to get them working again.
- Fix 1. Restart Your Mac
- Fix 2. Check Software Update
- Fix 3. Force Quit Apps on macOS Sonoma
- Fix 4. Update or Reinstall the Crashing Apps
- Fix 5. Run First Aid in Disk Utility to Fix Error
- Fix 6. Reinstall Rosetta 2 on macOS Sonoma
- Fix 7. Contact Apple Support
Why Are Apps on macOS Sonoma Not Working
After upgrading to macOS 14, many Mac users reported that their system was experiencing program crashes, and numerous applications were not working correctly, leading to frustration and disruption of their workflow.
Applications keep crashing on macOS Sonoma due to various reasons, including compatibility issues with the operating system, outdated or corrupted system files, and software conflicts with other applications. Additionally, problems with the app's code, such as bugs or memory leaks, can also cause crashes. Furthermore, issues with the app's dependencies, such as missing or incompatible libraries, can also lead to crashes.
- ⚠️Applications often crash due to a combination of factors, including file permission issues, software glitches, and outdated software versions. These problems can cause the application to malfunction or shut down unexpectedly, resulting in lost productivity and frustration for users.
- ❎The main reason for apps crashing on macOS 14 is the incompatibility with the MacBook.
- 😰The app needs to be updated to its latest version in order to function properly on macOS Sonoma.
If you're experiencing other issues after updating to macOS Sonoma, this article may help you out.
macOS Sonoma Issues [Fix 6 New Sonoma Problems]
The article provides insights and solutions to address issues related to macOS Sonoma, helping users understand the reasons behind the problems and find ways to overcome them. (Note: I've rewritten the text in a concise manner, as per your request)
How to Fix Apps Not Working on macOS Sonoma
If your applications are not working on macOS Sonoma, don't worry, there are numerous fixes to try. The top 7 solutions include a system restart, checking for software updates, running an app in compatibility mode, verifying app permissions, disabling extensions, resetting the Launchpad, and reinstalling the problematic app. By trying these fixes, you can troubleshoot and resolve the issue, getting your applications up and running smoothly again.
Fix 1. Restart Your Mac
Restarting or hard restarting your Mac can do wonders for your MacBook if you're experiencing issues with apps not working properly on Sonoma. This strategy helps refresh and reboot the entire system, allowing applications to run smoothly and effortlessly. To restart your Mac, follow these steps:
Step 1. 1. Click on the "Apple" icon located at the top left edge of the screen.
Step 2. Opt for "Restart".
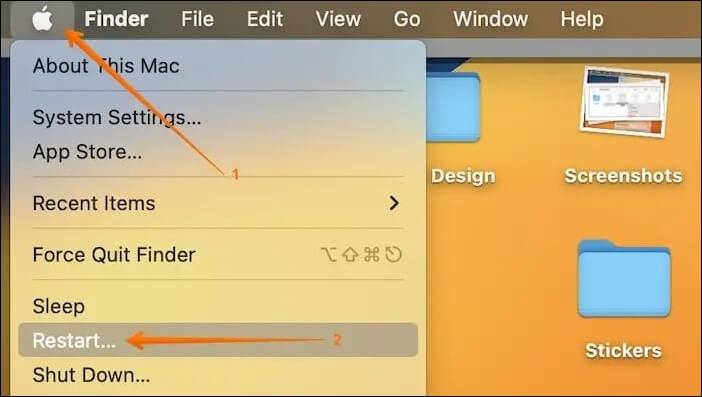
Step 3. If you want windows to reopen automatically when you log back in, tick the box next to "Reopen windows while logging back in".
Step 4. The restart process will begin again, and the system will try to load the operating system from the hard drive. If the restart process fails again, you may need to try a different method, such as booting from a USB drive or CD/DVD, to access the operating system and troubleshoot the issue.
Fix 2. Check Software Update
To verify if your macOS Sonoma update failed, check if your MacBook is still on the previous version of the operating system. If it is, it may indicate that the update failed. You can also check the Apple status page to see if there are any known issues with the update. If you're still experiencing issues, you can try restarting your MacBook and attempting the update again.
Step 1. Hit the "Apple" menu and opt for "System Settings".
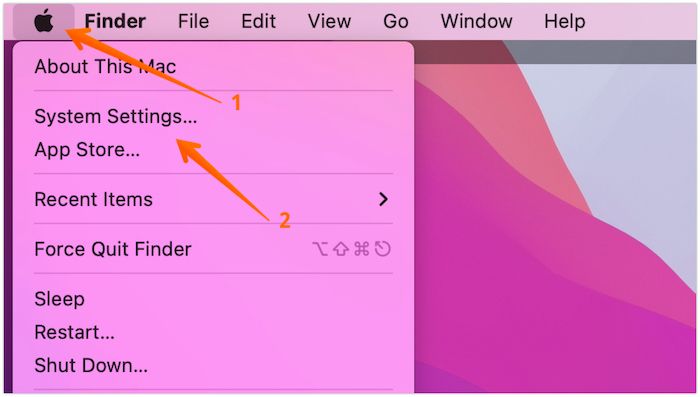
Step 2. Move to "General > Software Update".
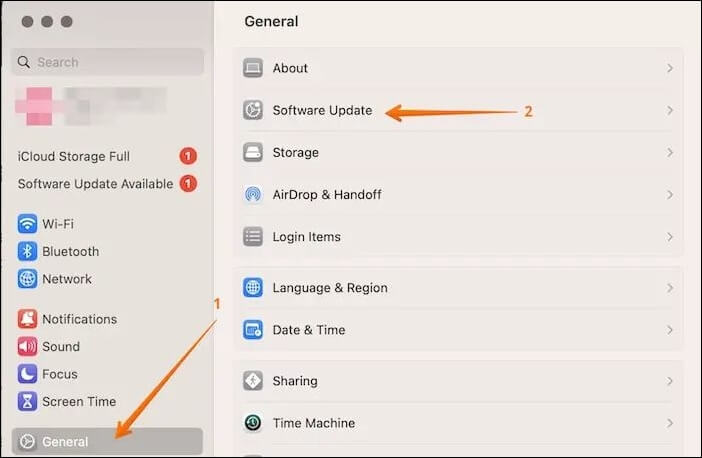
Step 3. 1. Wait for some time to search for the available updates, if any. 2.
If Software Update is not working on your Mac, consider reinstalling your macOS to fix this error. Most of the time, this method works, and this article will guide you on how to fix the "Reinstall macOS" option not responding on a Mac.
Reinstall macOS Not Working: 4 Tested Ways
The "reinstall macOS not working" issue can be frustrating, but there are several solutions to try. One approach is to boot into the Recovery Mode, which can be accessed by restarting the Mac and immediately holding down the Command (⌘) + R keys. From there, users can select the "Reinstall macOS" option and follow the on-screen instructions.
Fix 3. Force Quit Apps on macOS Sonoma
To fix apps not working on macOS Sonoma, one practical solution is to force quit the unresponsive application. This can be done by following these steps: Force quitting the app can resolve the issue if it remains unresponsive.
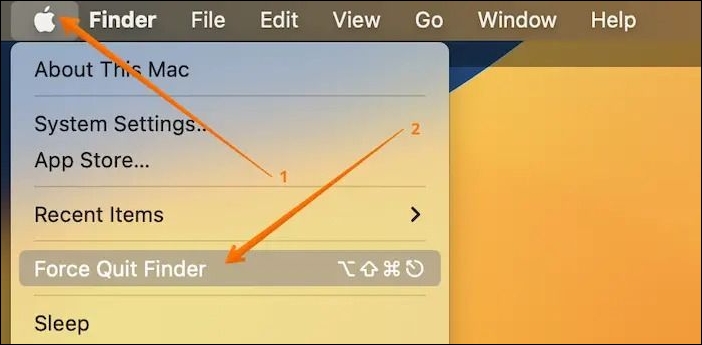
Step 1. Navigate to the "Apple" menu.
Step 2. Hit the "Force Quit" option.
Step 3. To force quit an application on a Mac, select the application from the Force Quit Applications window, then click "Force Quit".
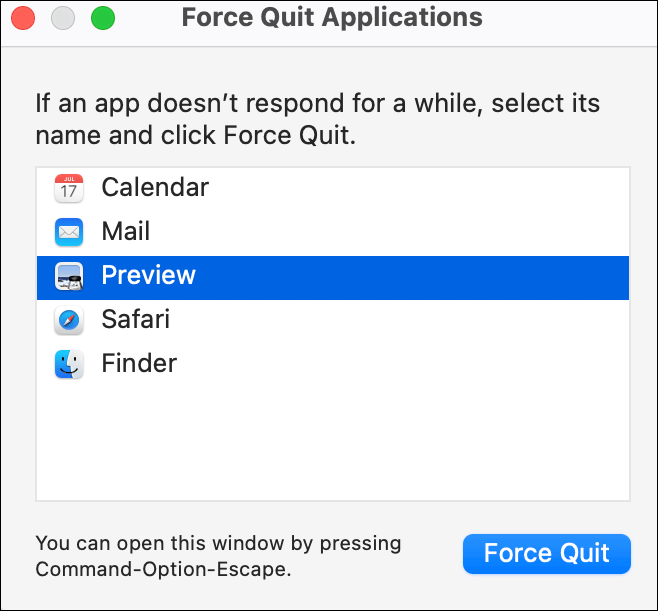
After force quitting an app, relaunch it by clicking on the reopen button, then restart your MacBook by going to the Apple menu, and verify the app's compatibility with your MacBook.
If your apps aren't working on macOS Sonoma, don't panic! There are several troubleshooting steps you can take to resolve the issue.
Fix 4. Update or Reinstall the Crashing Apps
If force quitting doesn't work on your Mac, the next step is to update or reinstall the problematic application. Start by looking for the application folder, searching for the app causing issues, and then drag it to the trash bin.
To uninstall and reinstall a crashed or frozen application, follow these steps:
Step 1. After uninstalling the program, you must reinstall it in order to complete the process.
Step 2. To reinstall an app, go to the App Store on your device, find the app you want to reinstall, and tap the "Get" or "Install" button to reinstall it. If you're prompted to sign in with your Apple ID, do so. If you're asked to enter your password, enter it.
If the App Store isn't working on your Mac, try these 5 quick solutions: restart your Mac, check for software updates, reset the App Store, clear cache, and check for issues with your Mac's internet connection. If these don't work, try these 4 practical fixes: reset the System Management Controller (SMC), reset the power management unit (PMU), reset the NVRAM, and reinstall the App Store.
If the App Store is not working on your Mac, there are several methods you can try to resolve the issue. One approach is to restart your Mac, as this can often resolve connectivity problems. If restarting doesn't work, you can try resetting the App Store cache by deleting the contents of the /Library/Caches/com.
Fix 5. Run First Aid in Disk Utility to Fix Error
If disk permissions for files linked with an application are broken or changed, it can cause an error for the application. To fix this, running First Aid in Disk Utility is a great option. This process can help mend disk permissions and resolve the issue, allowing the application to function properly again.
Step 1. Move to "Applications > Utilities" and launch "Disk Utility".

Step 2. You can choose the volume on which the application is installed by selecting the corresponding volume in the sidebar. This will ensure that the application uses the resources and storage available on that volume, rather than the system volume.
Step 3. Hit "First Aid" in the toolbar.
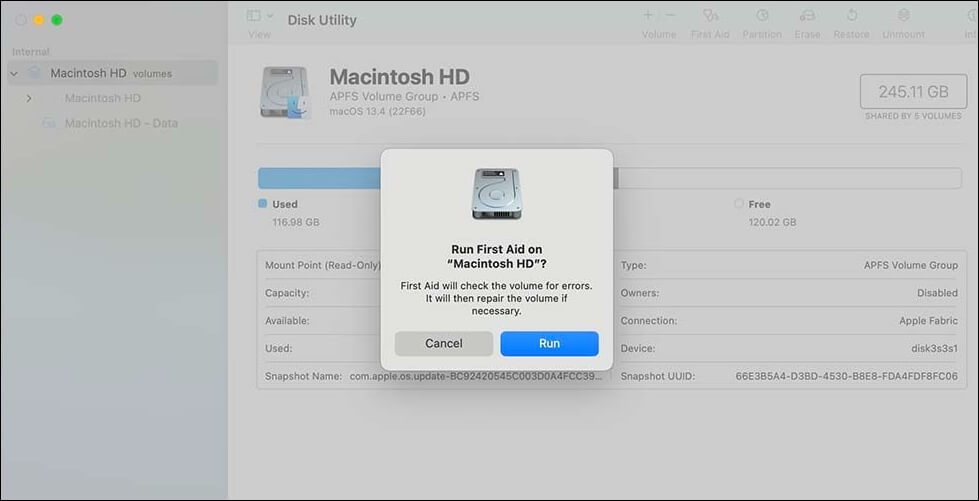
Step 4. Wait patiently for Disk Utility to perform its inspections and fix any issues it discovers.
Step 5. When the installation process is complete, exit the Disk Utility program and attempt to install the application again.
If the First Aid process has failed, don't panic. Instead, try the next two methods, which are likely to be more effective in resolving the issue. These methods are designed to be more comprehensive and may involve additional steps or techniques to address the problem.
Fix 6. Reinstall Rosetta 2 on macOS Sonoma
When Apple shifted from Intel-Apple's shift from PowerPC-based chips to its Silicon chip aimed to ensure developers would need to rebuild their applications for optimal performance on new Macs. To facilitate this transition, Apple introduced Rosetta, a technology designed to make the process smoother.
Rosetta 2, like its predecessor Rosetta, provides virtualization tools to allow Intel-coded apps to run on Apple Silicon. However, it can sometimes fail to install or get damaged when updating to a new OS version.
To reinstall Rosetta 2 on macOS Sonoma, follow these steps: reinstall Rosetta 2 as a fix to enable execution of non-native programs, as Sonoma cannot execute them natively. This should resolve the issue.
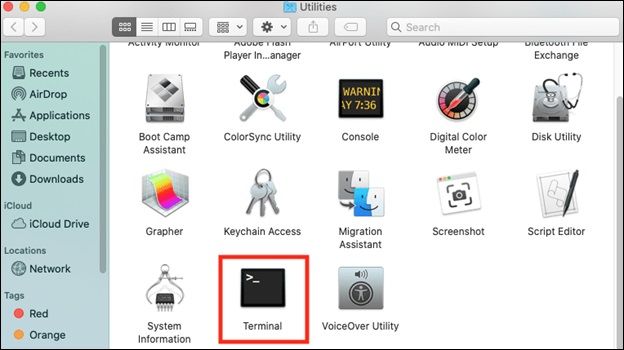
Step 1. Navigate to "Applications > Utilities" and open Terminal.
Step 2. Hit the "Return" button after typing this command: softwareupdate --install-rosetta.
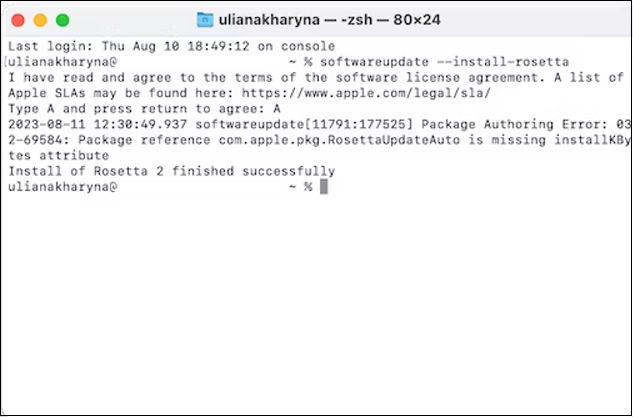
Go through the on-When the license agreement appears, click "Accept" to proceed. After a few seconds, you will receive confirmation that Rosetta 2 has been successfully downloaded.
Step 3. Now, quit "Terminal" and run the application once more.
Fix 7. Contact Apple Support
If you've tried all the troubleshooting steps but still experience frequent app crashes, it's time to reach out to Apple Support for further assistance.
💎Bonus Tip: Recover Lost Data from Application Crashes
If your apps aren't working on macOS Sonoma, you might accidentally lose data. If this happens, you'll need a reliable data recovery software to help you retrieve your lost data. A professional option like Deep Data Recovery Pro can assist in this situation.
Deep Data Recovery for Mac is a well-established data restoration program that supports the latest version of macOS, is compatible with multiple languages, and offers customizable pricing.
This top-Notch, a professional data retrieval program for Mac, can recover deleted files on macOS Sonoma from the empty Trash Bin, unintentional deletion, or other types of loss circumstances.
This tool allows you to select a hard drive, search for deleted files, and examine every file that can be recovered, making it useful for resolving various difficult data loss situations, especially for Apple users who need to restore deleted files quickly without relying on Time Machine backups.
Here are the steps to recover permanently deleted files on Mac in one paragraph:
Step 1. Search for lost files
To search for lost files on macOS, select the disk location to search from the dropdown menu, which can include internal HDD/SSD or removable storage devices, and click the "Search for lost files" button.
Note: Before attempting data recovery, it's recommended to create a backup of your Mac using the "Disk Backup" feature in the software, which will prevent further data loss. Once the backup is created, the software can then recover data from the backup, allowing your computer to be used for new data.

Step 2. Go through the scanning results
Deep Data Recovery for Mac will immediately scan your selected disk volume and display the scanning results.

Step 3. Select the file(s) and recover
To recover deleted files, select the desired file(s) from the scan results, then click the "Recover" button to restore them.

Conclusion
MacOS Sonoma offers several advantages, but it also brings more problems, with the most common issue being Mac programs closing abruptly. If your Mac apps stop functioning after the upgrade and you've experienced data loss, install Deep Data Recovery for Mac Pro immediately to recover your lost data.
Apps Not Working on macOS Sonoma FAQs
What are the top FAQs to consider for better understanding of the topic? The top FAQs include questions such as what is the topic about, what are the key points to consider, what are the benefits and drawbacks of the topic, and what are the common misconceptions about the topic.
1. Why are the apps not working on my Mac Sonoma?
The software may not be compatible with macOS Sonoma, or you may have skipped the update, or the app's linked files may be corrupted.
2. Is it safe to use macOS Sonoma?
Sonoma is Apple's most comprehensive and feature-rich upgrade in recent years, making it a safe and stable option for users.
Related Articles
- How to Recover Deleted Emails from Hotmail
- How to Enable Windows Defender on Windows 11/10/8
- How to Add Storage to Steam Deck [2023 Full Guide]
- PowerShell Check If File Exists | 4 Examples for PowerShell Users
- Msvcr100.dll Is Missing? Here Is How to Fix It [2023 Updated]
Are you receiving an error where it says Msvcr100.dll Is Missing? Then follow this easy guide to download the DLL and replace it on a working PC. You can also install the redistributable again to fix the problem or copy from a working PC of similar specification. - My Computer Turns on but the Screen Is Black Windows 10, How to Fix
Are you learning how to fix the